
This DIY shutter makeover project brings back some life to a worn out looking house, but does it on a budget.
Shutters have been used for years to add beauty to your home and also to give some privacy to windows. 
Note: Power tools, electricity, and other items used for this project can be dangerous unless used properly and with adequate precautions, including safety protection. Please use extreme caution when using power tools and electricity. Always wear protective equipment, and learn to use your tools before you start any project.
Change your Curb Appeal with This Shutter Makeover Project.
Nowadays, most of the time, shutters are not used in a functional way, but they do add a lot to the curb appeal of a home and really do a great job of showcasing windows.
Shutterscan be quite expensive. It is not unusual for a pair of shutters to cost $60 – $75 or more. We recently priced them for our home and the price would have been close to $400 to do all the front windows.
If you have been reading my blog, you will know that I don’t like to spend money unnecessarily. So, I grabbed my hubby, told him that removing our shutters was on his a honey do list and settled in until it was my turn to work.
In my mind, I saw this project coming together fairly quickly. In the end I realized that I am a delusional optimist at times. There are some projects that don’t come together the way you think they will!
The shutters on our house were painted a baby blue. I have always hated them, but never got around to doing anything about them.
They were attached to the brick on the main part of the house and (unfortunately) nailed to the siding on the right side extension.
Obviously, the siding guys did not believe in screws and raw plugs when they replaced our siding and put the shutters back on.
They were in half decent condition, so I thought I would just sand and paint them. My husband had a better idea.
He thought that if we reversed them, they would probably be in pretty good condition on the back and it would save us the cost of new ones and would look much better than painting over old wood that had seen its better days.
A few hours later, the shutters were off and he had a handful of perfectly good screws to re-use. (waste not, want not is my grandmother’s motto!)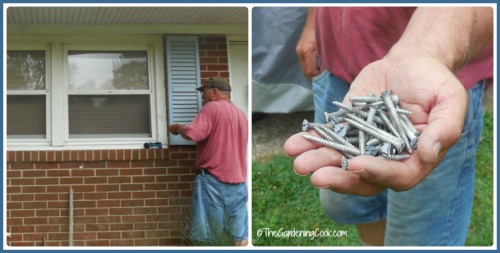 Hubby was right, the shutters were pretty much in perfect condition on the back. However, what appeared to be an army of wasps had made their homes behind the shutters.
This left large sections of wasp nests on both the brick wall, as well as on the back of the shutters. It was now my turn.
I used a large stiff hand brush to remove the wasp nests from the shutters. (the ones on the siding part of house got a power wash to clean them since they were not removed.) Now that the shutters were reasonably clean, I set about preparing them for paint. This is such an important step, but one that some people shortcut or skip altogether. My only suggestion is take your time.
Ultimately, your finished shutters will show how well you prepared them and if you skip this step, your paint finish will show this. 
First I sanded the shutters and then filled the screw holes. The previous owners did not believe in measuring evenly so the holes were in different spots!
I used Vinyl Spackling to fill the holes. This step took me about 4 hours and I was sick of it by the time I was done, but my shutters were as smooth as a baby’s bottom. The next step was to use a feather duster to remove the sand paper dust and a quick wipe with a damp sponge. Why do this?
If you have ever seen a painted surface that picked up all the dust from the sand paper, you wouldn’t ask this question. Once again, no shortcuts! Now came what I thought would be the easy part. Alas, my life is not destined to be easy. I thought it would be just stroke, stroke, stroke with a paintbrush.
The shutters were devious little menaces. I’m beginning to wonder if paying $375 for them would have been a better choice by this point. All those shutter slats had overlapping areas.
I had to paint into and under the corners of the slats with an artist’s brush to get the wood all covered. (see left photo below which shows the area the large brush misses) I got better at it as the shutters progressed, but the first two took me 2 hours for ONE coat.
One thing I would recommend is to have these sizes of brush. (mine was too big) At one point, I said to my husband “I feel as though I am cleaning a house with a toothbrush!”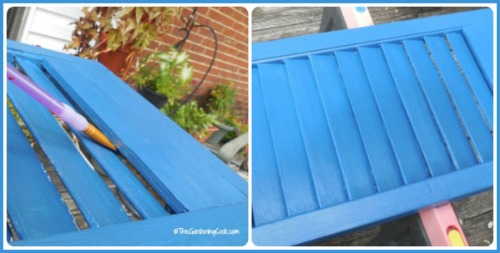
- artist’s brush size 3/8 – 1/2″
- Main paint brush 1-1/2″
These sizes give you the best coverage in the quickest time. I only had a 2 1/2″ brush on hand and it was not doing well at all
As is typical with me and paint colors, nothing is easy. I started out in my painting with a Behr paint and primer with a custom Ralph Lauren color called Rue Royale.
It looked very dark on the color swatch, but it ended up being much too “robin’s egg” blue color after the paint dried. And I learned that photos which will end up on the internet will be a color that you never dreamed they would be on your monitor.
The color swatch is shown below. It’s hard to believe that the paint ended up like the color above when it was dry! Back to square one! I painted over the the shutters with an exterior semi gloss Sherwin Williams paint color called Naval.
It is a very dark blue color and I much prefer the color when it was done. (and it was what I thought I was going to get from the first color!) I didn’t notice how blue the shutters looked until I saw the images on my computer and gave a huge sigh.
(note to self. Next time I will paint paint one – not all of them – and look at it on the computer!) Thankfully, this paint was on sale for 30% off, so it was not too much extra cost. These are the finished shutters. The next step was to power wash the eaves, brick work and steps so that the shutters really pop against the brickwork. There is no point in having newly painted shutters if you put them back on a dirty house.
Since our house had not been cleaning in forever, we rented a power washer to do the job. It is amazing the gunk that will come off bricks when a blast from a power washer hits them. Look at the base of the patio! And I thought our house was reasonably clean. (yikes!) At this point, my husband took over for a while. His plan was to make a template which shows where the holes are on the bricks, and then reuse the screws and make new holes in the shutters by using the template as a guide.
Our house is quite old and we don’t want to damage the bricks and make new holes in the bricks unless we have to. In the end, we only had to drill two new holes, so his plan worked out pretty well.
One of the shutters near the doorway has a light fixture that got replaced. The old light fitting was a simple bulb painted blue to match the shutters. (the previous owners liked baby blue!)
Not exactly what one would call an inviting light fixture is it? The difference is just amazing here. I adore the new light fitting. It only cost $37 but the difference that it made to the entry is astounding!
We just pulled the wires through the shutter slats, measured it and drilled a few holes and screwed it on. Easy, peasy, and quite a transformation from our old blue fixture and bulb!
The small patio to the right side of our house used to be a place to store garbage bins and a collection of items behind them.
We had a big clean out and took things to the back shed (where they belong!) and moved the garbage bins and recycling bins to the side of the house. The small patio is now a charming seating area!
I wish I had taken a picture of it with the junk on it (truth be told, I am ashamed of the way it looked and didn’t want to – it looked somewhat like an episode of hoarders!)
But I love it now… The dark blue shutters make the white look so crisp and clean.
After a few bouts of frustration matching the screw holes, the rest of the shutters all got put back on the house and look amazing.
They match the color of our new front door and I just love the way our entry looks now with the matching house number signboard and tall entry planters.
We ended up saving about $300 over the cost of buying new shutters (and ended up with a new patio!) but the project took about 30 hours to do. (It would have been much less, but I changed colors mid project after the shutters were all painted.)
Our only cost was the spackling, sandpaper, a few dollar store brushes, a new light fixture, two plastic Adirondack chairs and cushions, and some paint.
Have you ever reused your shutters by doing what I did with mine? Do you think the time involved was worth the money saved or would you have opted for new shutters instead?
Lyle
Saturday 26th of September 2020
Your light fixture is upside down.
Carol Speake
Sunday 27th of September 2020
Hi Lyle. We realized that after I posted the photo. I thought I had replaced it with a new one, but forget. I've updated the photo. Thanks for letting me know.