
It’s time to repair a broken planter! I recently bought one (on purpose at a discount) to have a matching set. But it needs some TLC.
Do you have a planter which is broken but you still want to use it? I had this situation, recently, and decided to just repair my broken planter. It was easy to do and took not much time at all.
Broken Planter Becomes a Part of a Pair.
I am currently in the middle of a make over of the front entry of my home. It has been a busy summer, full of expected and unexpected DIY wins and losses.
I intended to purchase two tall planters to showcase my entry, but this proved to be harder than I anticipated. In the end, I found the ideal planters. But they needed some repairs!
Unfortunately, one of them had a big chunk out of the corner and it was the last one in stock. We got 25% off the damaged one but I didn’t want to leave the planter as it looked with the damage. I decided to repair it so that the two would match.
Broken planter becomes a part of a pair.
The planters are tall black planters. My exterior color is navy blue, so the planters will get a coat of this paint so that they will match the shutters and front door.
Repairing the planter meant that I needed some Quick Steel Epoxy Putty.  This product is amazing. It is very pliable. You just take off the amount that you need and knead it a bit.
Then it is applied to the corner of the pot where the chunk is missing. It hardens very quickly and is very hard in about an hour and ready for the repair. Once the putty has hardened, the next step is to use a box cutter to trim the putty slightly, and then sand it into the shape of the opposite edge with some sand paper.
Since I plan to repaint the planters, the color difference didn’t bother me at all. The finished corner is smooth and shaped correctly and, once painted, the damage will not be visible at all!
 Now we are ready for the transformation. I taped the inside of the planter about 1 inch down to get a clean line for our paint.
The soil will be wet and I wanted to keep the paint somewhat above the soil line. Three coats of Behr exterior semi gloss paint and my planters are ready for planting. When the paint was dry, the edge of the planter did not even show that a repair had been made.
I put two liriope muscari variegata plants in each planter. They have the look of ferns but are more hardy. They are perennials and, here in NC, they stay green all winter, need very little care and come back year after year.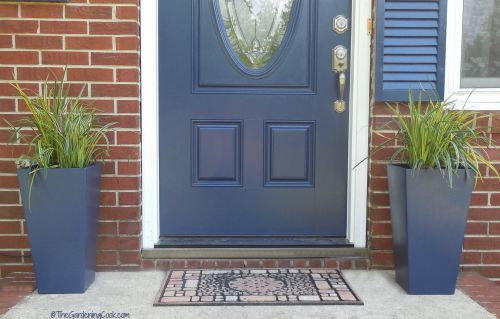
I love the way they look at my front entry. Instant curb appeal, don’t you think?