
Creating a fall door swag is a simple way to update your front door for autumn, especially for doors with oval glass centers. This project uses basic craft supplies and minimal tools, making it easy to put together.
The DIY tutorial breaks the process into clear steps, from selecting materials to assembling the swag. You can complete the project in under an hour. The door decoration works for both Halloween and Thanksgiving, and you can adjust the size, style, or colors to match your space.
When finished, you’ll have a fall door swag ready to hang and welcome your visitors. Follow the steps below to make this autumn front door decoration for your home.

We redid the entry of our house this summer and changed from a plain white panel door to one that has an oval glass panel on it. This makes decorating the front door with a normal wreath design a bit of a challenge. The answer is this fall door swag project!
Some of the links below are affiliate links. I earn a small commission, at no additional cost to you, if you purchase through an affiliate link. You can also find many of these supplies at your local Dollar Store or craft shop to save moneySupplies for the DIY fall door decoration
I like to use natural elements in my decorations, such as fern stems and branches. You’ll need the following supplies to make this project:
- 6 12-inch natural fern stems
- 2 natural pine branches
- 2 sunflower floral picks
- 10 green pipe cleaners
- 2 ½-inch autumn wire-edged ribbon
- 2 fall colored pussy willow floral picks
- 1 wreath hanger
How to make a fall door swag
When making the swag, keep in mind that both the top and bottom sections need to be balanced so that it fits well in the glass panel on the door.
Making the bottom section
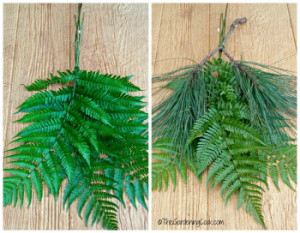
Take three fern leaves and lay them flat. Secure their stems with a green pipe cleaner.
Place a large pine tree stem with two branches on top of the ferns. Secure the ferns and pine branch together with another pipe cleaner.
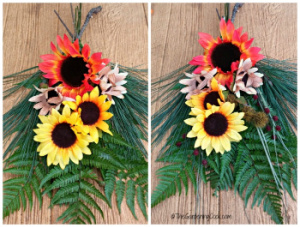
Adding the sunflowers
Layer one sunflower floral pick on top of the fern and pine branch base. Lay a stem of pussy willows next to the sunflowers.
Secure them with more pipecleaners.

Making the top of the fall door swag
To make the top of the swag, you repeat the steps you did for the bottom layer, but make it smaller so the finished shape of the door swag will be balanced from top to bottom.
When you have the top section done, position it above the bottom section, with the two pieces of the swag facing in opposite directions.
Secure the top swag piece to the bottom swag piece, leaving about 2 inches bare in the center for a bow to sit.
Make a floral bow
Use the wire-edged ribbon to make a floral bow. This is done by making large loops with the ribbon, tying them in the center, and leaving two loose ends to dangle down. See my tutorial for making a floral bow here.
Cut the ends of the ribbon at an angle and tie it to the center of the fall door swag. Puff up the loops of the bow.

Hang the autumn door swag on a wreath hanger, and the project is done!
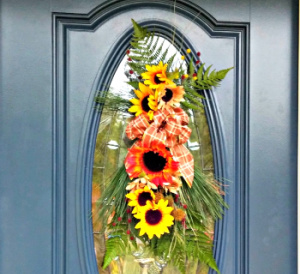
 I love the way the glass panel on my door is balanced with the swag.
The size and shape of the swag match the shape of my panel, and the color of the door is a great background for the pops of color from the sunflowers.
How do you decorate the front of your door if you have a glass panel? Tell me your ideas in the comments below!
More front door swag tutorials to try
If you prefer using door swags instead of door wreaths, check out these tutorials, too.

- Easter grapevine door swag – with butterflies, bunnies, and eggs!
- Festive Ice Skates Door Swag – decorating a door for winter.
- St. Patrick’s Day door swag– a leprechaun hat door decoration.
Share this front door fall decoration on X
If you enjoyed this twist on a front door wreath, why not share this tutorial with a friend? Here is a post to get you started:
🎃🍁 How to Make an Autumn Door Swag. This rustic welcome for your front door is perfect if your door has a glass panel. 🍂🌻 Get the step-by-step tutorial on The Gardening Cook. #FallDecor #DIYDecor #DoorSwag #FrontPorchStyle #DIYHome Share on XPin this DIY fall door decoration
Would you like a reminder of this tutorial for making a fall front door swag? Pin this image to one of your fall boards on Pinterest so that you can easily find it later.

Admin note: This front door swag tutorial first appeared on the blog in October 2015. This post has been updated with new photos, a printable project card, and a slideshow video about fall decorating.
DIY Fall Door Decoration - Autumn Door Swag
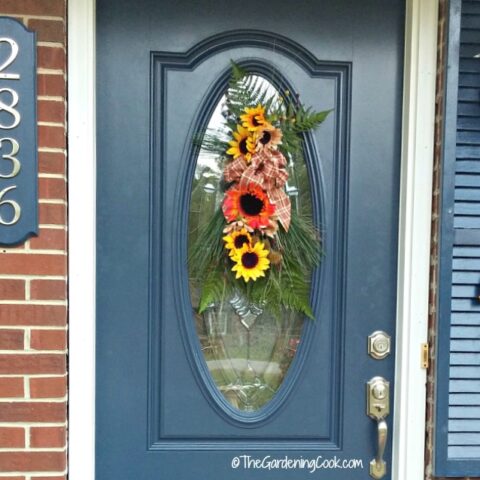
This fall door swag is a twist on a normal front door wreath. The shape fits a door with an oval glass center beautifully.
It's easy to make and comes together in under an hour.
Materials
- 6 12-inch fern stems
- 2 pine branches
- Sunflower floral pick
- 10 green pipe cleaners
- 2 ½-inch autumn wire-edged ribbon
- Fall colored pussy willow floral picks
Tools
- 1 wreath hanger
Instructions
- Lay two fern leaves, one on top of the other, and secure their stems with a green pipe cleaner.
- Place a large pine tree stem with two branches on top of the ferns. Secure them with a pipe cleaner.
- Place one sunflower floral pick on top of the fern/pine branch base. Tie it to the base with a pipe cleaner.
- Add a stem of pussy willows and tie it to the base, next to the sunflowers.
- This completes the bottom section of the swag.
- Repeat steps 2,3, and 4 for the top section, but make the top section smaller in total size, so the door swag will be balanced.
- Position the smaller top above the larger bottom section, with the two sections positioned in opposite directions.
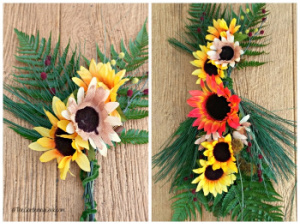
- Secure the top swag piece to the bottom swag piece, leaving about 2 inches bare in the center for the bow to sit.
- Make loops with the wire-edged ribbon, tie them in the center, and let the two ends dangle down. You can see directions for making a floral bow here.

- Hang the finished fall door swag with a wreath hanger.
- Display with pride.
Recommended Products
As an Amazon Associate and member of other affiliate programs, I earn from qualifying purchases.
-
 Long Stem Artificial Sunflowers for Tall Vase, Silk Fake Fall Sunflowers for Home Wedding Party Decoration (6 Mixed Colors)
 -
 Pipe Cleaners 100 Pieces Chenille Stems Dark Green for DIY Art Decorations Creative Craft (6 mm x 12 Inch)
 -
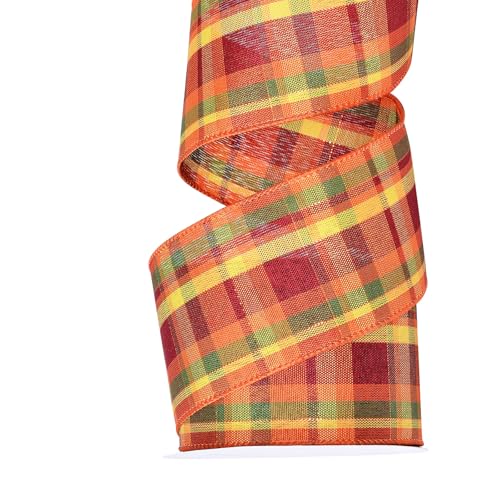 Fall Ribbon Wired, 2-1/2 Inch x 10 Yards, Fall Plaid Ribbon Wired for Wreaths Bows Crafts Decoration Orange Yellow Green
Carolyn Juran
Sunday 3rd of September 2017
I'd love to know the color of the front door. I have brick and bluestone and am redoing shutters and the door.
Carol
Sunday 3rd of September 2017
Hi Carolyn.
The color of the door is Sherwin Williams Naval. I had this shade tinted into a Behr exterior semi gloss paint. (I prefer Behr over Sherwin Williams paint which we tried but it ended up too thick and was messy on the paint job, so we started over with the Behr paint.) Carol
Evelyne
Saturday 17th of October 2015
I need to do something like this. I don't have any flowers left...but I could totally improvise. I love a good door decoration!
Carol
Saturday 17th of October 2015
I have some roses and dahlias still blooming. Very pretty.
Carol
Friday 16th of October 2015
Thanks Renee. It's the first time I have made a swag, so I enjoyed it.
Renee Fuller
Friday 16th of October 2015
Great tutorial and post on creating this lovely swag
Becka
Friday 16th of October 2015
Oh that is so pretty. I think it looks great on your door. Good job!
Carol
Friday 16th of October 2015
Thanks Becka. It was a fun project to do.