
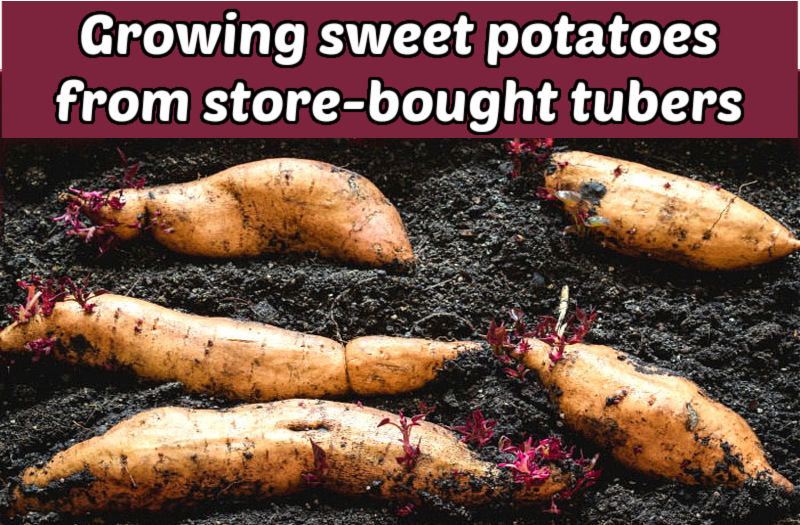
Growing sweet potatoes from store-bought tubers is a fun and easy vegetable gardening project the whole family can enjoy. Even beginners can successfully start sweet potato slips and watch them grow.
In this tutorial, you’ll learn how to make slips from store-bought tubers, grow them in water or soil, and figure out which end to place in water for the best results.
Using store-bought sweet potatoes is a cost-effective way to grow more plants, and they can even be grown indoors as a decorative tabletop display.
Keep scrolling to discover how to turn sprouted sweet potatoes into thriving plants at home.
Some of the links below are affiliate links. I earn a small commission, at no additional cost to you, if you purchase through an affiliate link.

Growing sweet potatoes from store-bought tubers
Whether you prefer growing slips—the small shoots that sprout from a store-bought sweet potato—in soil or water, these step-by-step instructions make it easy to grow sweet potatoes at home.
Depending on their size, each sweet potato can produce dozens of slips, so just a few sweet potatoes will give you enough sprouts for many sweet potato plants.

Starting sweet potatoes from slips in soil
Starting slips in soil is a simple, hands-on way to grow sweet potatoes at home. You’ll need these supplies:
- 1 store-bought organic sweet potato
- Light, well-draining potting soil
- 1 left-over rotisserie chicken container
- A small garden trowel or fork
- A watering can or mister
This method of starting sweet potato slips is the fastest way to get plants growing. If you have a sweet potato in the cupboard that is starting to sprout, you have an even better head start!

Soil method for sweet potato slips
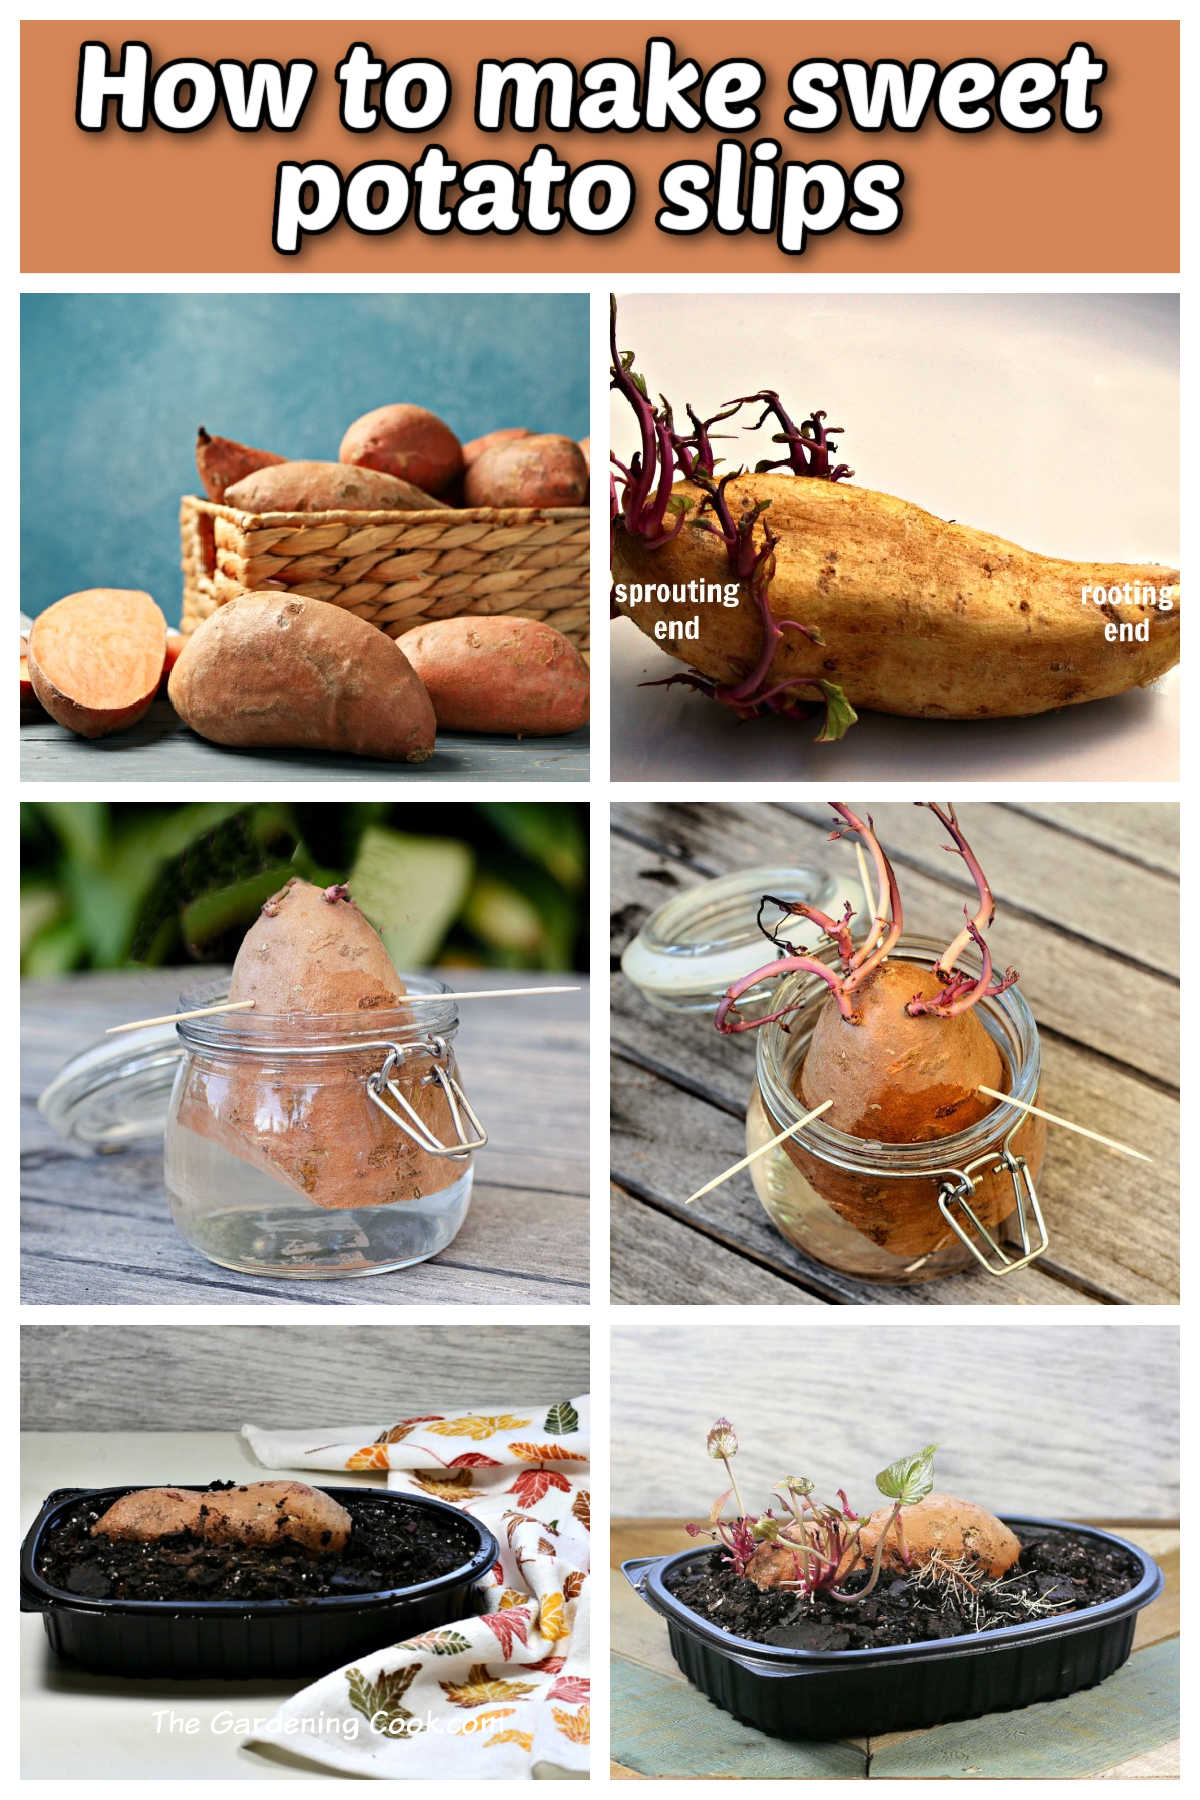
- Choose a shallow container. Pick one with drainage holes in the bottom or add gravel to the container before you add soil. A clean rotisserie chicken tray works great for a single sweet potato.
- Fill with soil. Add well-draining potting soil or a seed starting soil to the container. Moisten the soil well.
- Add the sweet potato. Place a sweet potato on top of the soil. Add more soil so that it covers the sides of the potato halfway up.
- Cover the container. Place the plastic top on the container. Covering the top helps to hold in humidity in the tray.
- Monitor the moisture. Keep the soil moist by misting it lightly if it starts to dry out. Store the container in a warm location.

In about a week, you will see roots forming in the soil. In another week, sprouts (slips) will begin to grow around the top of the sweet potato.
When the sprouts are about 5-6 inches long, separate them from the sweet potato to plant in individual pots or directly in the garden.
Starting sweet potato slips in water
If you’d rather grow slips in water, it’s just as easy—and a fun way to watch the roots develop right before your eyes. You’ll need these supplies:
- 1 Mason jar
- 4 toothpicks
- Water
- Well-draining soil (when the slips are ready to plant)
Which end of sweet potato goes in water? For the water method, make sure to place the correct end of the sweet potato in the water, so that roots will form. These tips show how to know which end goes in the water.

- Inspect the potato. Wash the sweet potato well. Inspect your sweet potato to see if you can find any tiny roots showing. This is the root end of the sweet potato. It usually tapers to a point.
- Let it sprout. If you cannot tell the sprouting end from the rooting end, place the sweet potato in a warm place for a few weeks. Buds will emerge, and you’ll know which end goes in the water!

Water method for sweet potato slips
- Add toothpicks. Insert 4 toothpicks around the sweet potato about 2 inches down from the top end.
- Suspend the sweet potato. Place the tuber in a Mason jar partially filled with water. Put the sprouting end of the sweet potato above the water level and the rooting end into the water below. Be sure there is room in the water for roots to grow.
- Keep warm. Place the jar in a warm location such as a sunny window or on a heat mat.
- Change the water. Every 2-3 days, add fresh water to prevent bacteria from forming. Ensure the water stays above the rooting end of the sweet potato.

Roots will form in about a month, and then sprouts (slips) will start to grow.
When 5-6 sprouts have formed, separate them from the sweet potato so they can be planted in soil.
Preparing and separating sweet potato slips
Whether you choose to start with the water or the soil method, once the sweet potatoes have sprouted and grown some roots, it is time to separate them into slips for planting.

- To separate the slips, twist each sprouted area away from the sweet potato.
- Place the slip in a Mason Jar with the bottom part of the stem area submerged in water and the sprouted leaves hanging over the edge of the jar.
- In a few days, roots will form at the bottom of each plant.
- Keep the water fresh by changing it every 2-3 days.
- The slips are ready to plant when the roots are several inches long.
- Discard any slips that didn’t root or are wilted.

Note: after separating the slips from the sweet potato, you can continue trying to grow more slips on the potato to plant later! I kept having mine sprouting for many weeks after I got my first slips.
How to plant sweet potato slips
Once the slips have rooted and are growing, they are ready to transplant. You can plant the slips in individual pots as a decorative plant, or grow them outside once the soil has warmed to 70-80°F. (21-26°C).
Sweet potatoes can be grown in the ground, in raised beds, or in large containers or potato bags.
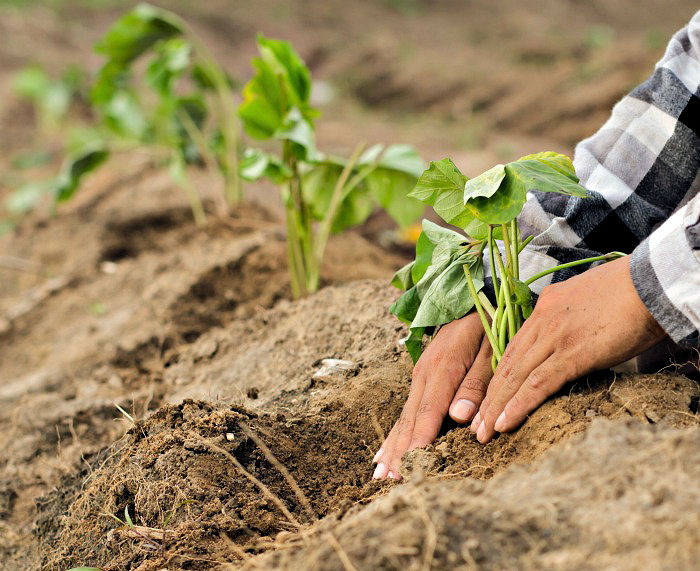
- Sweet potato slips are ready to be planted outdoors as soon as all chance of frost is over and the ground has warmed sufficiently.
- Plant the slips about 12 – 18 inches apart with rows about 4 inches deep. Sweet potatoes need a lot of room to grow, so don’t crowd them.
- Soak the soil thoroughly after planting, making sure the area around the slips is very wet. Water the slips every day for the first week and 3 times during the second week.
It takes about 3 months for sweet potato slips to produce sweet potatoes to eat.

Internet Archive Book Image from page 470 of “Southern field crops” (exclusive of forage plants)
(1916) (no known copyright restrictions)
FAQs about growing sweet potatoes from store-bought tubers
What is a sweet potato slip?
Sweet potato slips (sometimes called sweet potato starts) are small shoots that grow from a sweet potato (Ipomoea batatas). These slips are planted to grow new sweet potato plants.
Can you grow sweet potatoes indoors?
Sweet potatoes can be started indoors while slips are forming. However, to grow edible tubers, the plants need to be moved outdoors once the weather is warm.

Can you plant a whole sweet potato in the ground?
This is possible, but planting slips is recommended. Slips produce healthier plants and reduce the risk of rot. Planting a whole potato also crowds the tubers, which will result in smaller sweet potatoes.

How many slips will grow from one sweet potato?
The yield can vary, but as a rule of thumb, each sweet potato typically produces 5 to 20 slips, and you will get about 3-5 potatoes from each slip.

What type of soil do sweet potato slips like?
Sweet potato slips prefer friable, well-draining soil with plenty of organic matter added to make the soil looser.
Can sweet potatoes be grown as a decorative plant?
Yes. Sweet potato vines grow well indoors in water or soil and make an attractive trailing houseplant, though they won’t produce edible tubers indoors.
What pests or critters affect sweet potato plants?
Sweet potatoes may be affected by deer, rabbits, insects, or rodents, especially outdoors. Healthy soil and proper spacing help reduce problems.

Share this guide on how to grow sweet potatoes from store-bought tubers on X
If you enjoyed learning how to grow sweet potato slips, why not share this guide with a friend?
Do you have some sprouted sweet potatoes? Don't throw them out. Plant them in water or in soil to make sweet potato slips. These sprouts will grow new plants! 🌿🥔🌿 Share on XPin this post for planting sweet potato slips
Would you like a reminder of this tutorial for growing sweet potatoes from slips? Pin this image to one of your vegetable gardening boards on Pinterest so that you can easily find it later.
Admin note: This post on how to plant sweet potato slips first appeared on the blog in April of 2013. I have updated the post to add new photos, a growing tutorial, a project card with step-by-step instructions, and a video for you to enjoy.
How to Grow Sweet Potato Slips from Store-Bought Tubers

Step-by-step guide to starting sweet potato slips from store-bought tubers, rooting them in water or soil, and growing them into thriving plants at home.
Materials
- 1 store-bought organic sweet potato
- Light, well-draining potting soil
- 1 left over rotisserie chicken container
- 1 Mason jar
- 4 toothpicks
Tools
- Garden trowel
- Hose or watering can
Instructions
To start sweet potatoes in soil
- Add soil to a clean rotisserie chicken tray lined with pebbles.
- Place a sweet potato on top of the soil. Add more soil so that it covers the sides of the potato halfway up.
- Place the plastic top on the container.
- Keep the soil moist by misting it lightly if it starts to dry out.
- Keep the container in a warm location.
- In about a week, you will see roots forming in the soil. In another week, sprouts (slips) will begin to grow around the top of the sweet potato.
- When the sprouts are about 5-6 inches long, separate them from the sweet potato to plant in individual pots or directly in the garden.
To start sweet potato slips in water
- Wash the sweet potato well.
- Insert 4 toothpicks around the top of the sweet potato about 2 inches down.
- Suspend the sweet potato in a Mason jar partially filled with water. Place the sprouting end of the sweet potato above the water level and the rooting end below the water level.
- Keep the jar in a warm location.
- Change the water every 3 days to keep it fresh. Ensure the water stays above the rooting end of the sweet potato.
- Roots will form in about a month, and then sprouts (slips) will start to grow.
- When 5-6 sprouts have formed, separate them from the sweet potato so they can be planted in soil.
Separating the sweet potato slips
- Once the sweet potatoes have sprouted and grown some roots, it is time to separate them into slips for planting.
- To separate the slips, twist each sprouted area away from the sweet potato.
- Lay the slip in a Mason Jar with the bottom part of the stem area submerged in water and the sprouted leaves hanging over the edge of the jar.
- In a few days, roots will form at the bottom of each plant.
- Keep the water fresh by changing it every 2-3 days.
- The slips are ready to plant when the roots are several inches long.
- Discard any slips that didn't root or are wilted.
- Plant the slips indoors in soil in a sunny location in well-draining soil, or outdoors when the soil has warmed to 70-80°F. (21-26°C).
- Space the sweet potato slips 12-18 inches apart and plant 4 inches deep. Keep well watered.
- Sweet potatoes will be ready to harvest in 3 months.
Recommended Products
As an Amazon Associate and member of other affiliate programs, I earn from qualifying purchases.


Nellie Suess
Friday 14th of February 2014
does the sweet potato grown this way produce after you plant it?
admin
Friday 14th of February 2014
Yes it should as long as you plant organic sweet potatoes. Normal ones are often sprayed with sprout suppressing chemicals.
Even better is to get one from your local farmers market so you know it will grow in your conditions.
Carol
janice leegette
Saturday 13th of April 2013
Awesome..will try. I tried the advodo but for some reason it failed. My mom use to grow them with no problem. Want to continue the tradition since she passed. Please help? ?
Julie
Sunday 13th of August 2023
@admin, I found that the best way to sprout an Avocado seed is to wrap it in a damp paper towel, put it in a zip lock bag and place it somewhere dark for a couple of weeks. It will sprout and then can be planted in the ground. Don't let the paper towel dry out.
Saturday 20th of April 2013
I plant avocado in the dirt. It takes a couple weeks to sprout. Put several in a pot.
admin
Saturday 13th of April 2013
I have found avocados pretty easy to grow. Take three toothpicks...insert them in the avocado about 1/3 of the way down. (pointed side up)
Place the toothpicks over a glass of water and keep the water fill almost up to the tooth picks.
The avocado will grow roots from the bottom and the top will split and a plant will grow out. It may or may not bear fruit. If it does...takes about 7 years I have heard.
Carol