
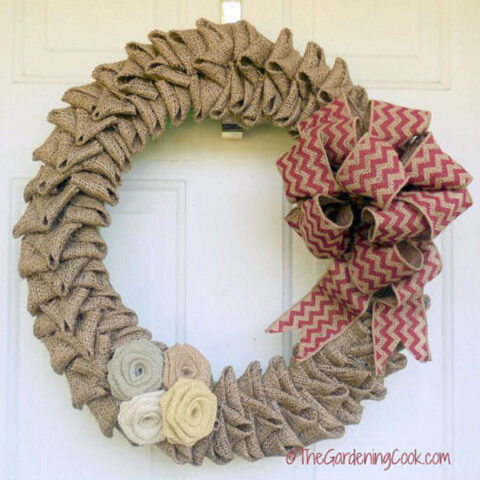
This tutorial shows how to make a burlap wreath with flowers, step by step. The wreath will add a rustic look to your front door that is perfect for fall.
This easy, budget-friendly wreath can be made with a few basic supplies in under two hours. It looks store-bought but costs far less to make.
Burlap is a sturdy material that comes in a variety of colors and patterns. This makes it perfect for both seasonal and everyday use.
The process for making a burlap DIY wreath is straightforward, and once you learn the basics, you can easily adapt it for any season.
Keep reading for the step-by-step easy burlap wreath tutorial.

Some of the links below are affiliate links. I earn a small commission, at no additional cost to you, if you purchase through an affiliate link.
Supplies for the burlap DIY wreath

To make this burlap flower wreath, you’ll need the following supplies:
- A 14-inch (35 cm) straw wreath form
- 1 yard (91 cm) of green burlap fabric
- One roll of 4-inch (10 cm) wide brown burlap ribbon
- 4 burlap roses
- 1 roll of 2.5-inch (6.5cm) wide wire-wrapped burlap ribbon with chevron stripes
- 1 package of galvanized floral greening pins
- Door hanger
You’ll also need some scissors.
DIY burlap wreath instructions
To start, cut 4-inch (35 cm) wide strips from the yard of green burlap fabric. You will need about 30 feet (9 meters) of fabric to cover the straw wreath form.
Roll the green fabric burlap strips around the straw wreath, overlapping them slightly until the wreath form is covered. Use 2 greening pins to secure the fabric to the wreath form.

When you are done, the entire wreath form will be covered in green fabric with no straw showing.

Burlap frays easily, so make sure to overlap the edges. When you are done, use scissors to trim off any fibers that show.

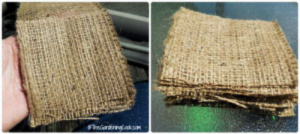
Now, take the roll of 4-inch (10 cm) brown burlap ribbon and cut it into 4 x 4-inch (10 x 10 cm) squares. I used approximately 190 squares to make the petals for the wreath.
The number you will need may vary depending on how tightly you place the petals on your wreath.

Making the “petals” for the wreath
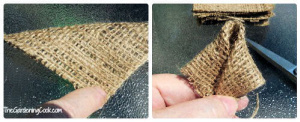
Fold each burlap square into a triangle and then bring the ends in to meet in the center.
One edge of the burlap ribbon will have an edge that is folded so it will not fray. Always keep that end to the outside of your petals.
The photo below shows the shape of the petals on the wreath form.
You can practice by making a single row of petals down the center of the green wrapped burlap wreath form and securing them with floral pins.

Once you get used to making the petal shapes, you will find that the wreath form is easier to cover if you position side petals first, and then add the center petal on top of them.
This keeps the petals even and also saves on the amount of floral pins that you will need, since you can secure three petals at once with this technique.

Keep making these three-petal shapes until the entire top of the wreath is covered with petals.
Making a floral bow
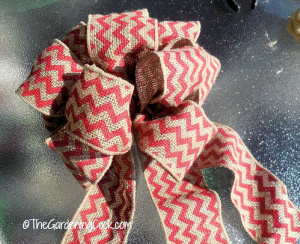
The next step in this burlap wreath tutorial is to make a bow from the wired burlap ribbon with the chevron design. You will need about 12 feet of the chevron ribbon. (How much you use depends on the size of the bow you want.)
Keep making large loops until you have a bow the size that you like, and tie it firmly in the middle with a 12-inch (30 cm) piece of the ribbon.
The wire edging on the ribbon allows you to “plump up the loops” for a great look. If you are having trouble making the bow, check out this step-by-step tutorial on how to make a wire ribbon bow like this.![]()
![]() Use the two ends that tied the bow to secure it around the wreath form. Fold one end so that it will not fray, and secure the overlapped ends of the bow in place with the foral pins.
Use the two ends that tied the bow to secure it around the wreath form. Fold one end so that it will not fray, and secure the overlapped ends of the bow in place with the foral pins.

Leave two long ends to dangle down from the bow. Cut a V shape at the end of each dangle.
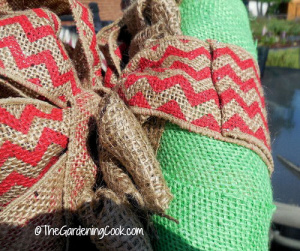
Here is a close-up photo of the bow – it can be plumped as full as you would like it.
![]()
![]()
Adding the rose flowers to the burlap wreath
To finish off the burlap wreath craft, use a greening pin through the center of each of the 4 burlap roses and secure them to the wreath form.
I used four different colors in my wreath (cream, yellow, green, and tan). Lay the burlap roses over each other in a cluster to add some dimension to the wreath.

Here is a close-up of the burlap flowers. Don’t they add a great look to the wreath? I love the way they layer over each other.

The finished result is so pretty! To attach it to your door, slip the wreath form over the bottom of a wreath hanger.
Share this burlap wreath tutorial on X
If you enjoyed learning how to make this DIY burlap wreath, why not share the project with a friend? Here is a post to get you started:
🌿 DIY made simple! Learn how to make a burlap wreath with step-by-step instructions and & budget-friendly supplies. It's perfect for any season! 🍂 #DIYDecor #Crafts #BurlapWreath #HomeDecor #DIYProjects Share on XMore burlap DIY projects
If you enjoy the look of burlap for home decor, here are a few more projects to try.

- Burlap Tea Bag Jars – How to make this DIY tea holder project.
- Rope Wrapped Eggs – It’s time for a farmhouse Easter decor craft.
- Burlap Wine Bottle Bag – This easy project makes the perfect Christmas gift.
Pin this burlap flower wreath tutorial
Would you like a reminder of this DIY burlap wreath tutorial? Pin this image to one of your DIY boards on Pinterest so that you can easily find it later.

Admin note: This tutorial for how to make a wreath with burlap first appeared on the blog in May 2015. This post has been updated with a printable project card, revised instructions, and a slideshow video.
Making a Burlap Wreath with Flowers and a Chevron Bow
Making a burlap wreath is easy to do in one afternoon with just a few basic supplies. The finished wreath looks store-bought, but at a fraction of the retail price of a new wreath.
Materials
- A 14-inch (35 cm) straw wreath form
- 1 yard (91 cm) of green burlap fabric
- One roll of 4-inch (10 cm) wide brown burlap ribbon
- 4 burlap roses
- 1 roll of 2.5-inch (6.5cm) wide wire-wrapped burlap ribbon with chevron stripes
Tools
- Scissors
- Galvanized floral greening pins
- Wreath door hanger
Instructions
- Use the scissors to cut 4-inch (35 cm) wide strips from the yard of green burlap fabric. You will need about 30 feet (9 meters) of fabric to cover the straw wreath form.

- Roll the green fabric burlap strips around the straw wreath, overlapping them slightly until the wreath form is covered.

- Use 2 greening pins to secure the fabric to the wreath form.
- Trim any loose burlap fibers with the scissors.
- Cut the roll of 4-inch (10 cm) brown burlap ribbon into 4 x 4-inch (10 x 10 cm) squares. You will need approximately 190 squares to make the petals for the wreath.
- Fold each burlap square into a triangle and bring the ends in to meet in the center.
- Work from the center of the wreath form. Make side petals first, and add a center petal on top of them. Secure each three-piece petal section with a floral greening pin.

- Be sure that the folded edge of the burlap is on the outside of the petals so that they do not fray.
- Keep adding these petal sections until the whole top of the wreath is covered in petals.
- Use the chevron striped wire-edged ribbon to make a large bow. Do this by making large loops until you get the size you want. Tie it in the middle tightly with a piece of burlap ribbon, leaving two ends to dangle down from the bow.
- This tutorial shows how to make this type of bow.
- Secure the bow to the wreath form with the pieces that tied the bow. Turn one end under so that it will not fray, and pin it to the wreath form with floral pins.
- Use scissors to cut a V shape on the two loose ribbon ends.
- Place a floral greening pin through the center of each burlap rose and secure them to the wreath form in a cluster to add some dimension to the wreath.

- Hang the wreath on your door with a wreath door hanger.
Recommended Products
As an Amazon Associate and member of other affiliate programs, I earn from qualifying purchases.
-
 FloraCraft Straw Wreath Form 14 Inch Natural
 -
 9.8FT Burlap Roll - Decoration Burlap for Crafts Boho Rustic Green
 -
 ZOENHEI 300 Pieces 1.7 Inch Greening Pins, Floral Fern Pins Floral Pins for Foam, wreaths
 -
 4" Natural Burlap Fabric Roll 10 Yards Jute Ribbon for Craft Projects wreaths Decoratio
 -
 20 Pcs Burlap Flowers Handmade Rustic Flower Vintage Burlap Rose Flowers,10 Styles
 -
 Chevron Wired Edge Ribbon (2.5", Orange White) - 10 Yards
Laurie Emerson
Sunday 7th of June 2015
This wreath is absolutely beautiful! I have used burlap to make purses and shopping bags.
admin
Sunday 7th of June 2015
Thanks for the nice comment Laurie. I really had fun making it and love the way it turned out too. The burlap flowers seem to add a nice touch. Carol
Linda MixedKreations
Monday 18th of May 2015
Very pretty wreath! I love burlap project. You make it look simple. Thanks for sharing your tutorial. Thanks for the chance to win the tote and pretty flowers.
admin
Monday 18th of May 2015
Thanks Linda. Glad you liked the project. Best of luck with the contest! Carol
Penny Patterson
Tuesday 12th of May 2015
Love the burlap so earthy and pretty can't wait to make it.
thank you so much.
admin
Tuesday 12th of May 2015
Hi Penny. Glad you like it. I had so much fun making mine. Carol
Eco Friendly Burlap Tote Bag and Four Burlap Flowers Giveaway - Giveaway Promote
Friday 8th of May 2015
[…] Enter this Giveaway at The Gardening Cook […]
Carol Speake
Thursday 7th of May 2015
Very pretty project.
Carol