
Pumpkin Carving Tips and Creative Ideas for Halloween
These pumpkin carving tips will help you turn an ordinary pumpkin into a fun and creative Halloween decoration.
From choosing the right pumpkin and gathering basic carving tools to creating simple jack-o’-lantern faces and more elaborate designs, a little preparation can make your carving project easier and more successful.
Whether you prefer a traditional spooky face or a more unusual creation, these tips and ideas will help you get started.
Some of the links below are affiliate links. I earn a small commission, at no additional cost to you, if you purchase through an affiliate link.

Choosing a pumpkin
Before we carve a pumpkin, we have to select the right one for the job. There are a few things to look for when choosing the best pumpkin for carving.
- Make sure there are no soft spots that could indicate spoilage.
- Be sure the pumpkin has a sturdy stem.
- Try to find a pumpkin that will sit flat after it is carved. (If you have to cut off a piece of the bottom for it to sit straight, the pumpkin will rot more quickly.)
- Go for a big pumpkin. Large pumpkins are easier to carve.
- Light-colored pumpkins tend to be softer and easier to carve.

Inspect the stem
Pumpkin stems are a big part of the design. Choosing the right stem can make a lot of difference in your finished look.
- Look for a stem that has a slightly green color.
- Brown stems can be brittle and may dry out.

Using the stem for a sideways pumpkin carving
- Get creative! Turn the pumpkin sideways and use the stem as a nose!
- Make your opening on the bottom of the pumpkin to remove the pulp.
- Then carve the eyes and mouth above and below the stem nose.

Basic tools for carving pumpkins
You will need a few basic tools to carve a pumpkin. A plain kitchen knife will cut the pumpkin but not give you the professional results that you want.
A pumpkin carving kit with tools most commonly used for carving can be a great investment. It will help you get the professional results you want. These basic tools are needed, at a minimum:
- Scooper to remove the pulp and seeds. Ice cream scoops work fine, too.
- Sharp knife to cut shapes.
- Drill to make small circular openings.
- Small saw to cut easily.
- Pumpkin carving stencils for your design
- Tape to position your stencil.
- Candle or LED light for the finished pumpkin for the glow.

How to use special pumpkin carving tools
Each of these tools is used differently. Read on to find out how to use them.
- Scooper – The scooper is used to pull all the pumpkin seeds out of the pumpkin and then to make a smooth wall on the inside that makes it easier when you start carving.
- Poker – Use the poker to make small holes all along the design of your pattern. Once you have done this, you can remove the pumpkin stencil and save it to look at for reference when you start to carve the pumpkin.
- Drill – A drill is used to make holes through the pumpkin along the lines of small holes that you make with a poker without much elbow grease.
- Saw – Once you have the design cut into the pumpkin, it is time to use a saw. Hold it like a pencil and move it up and down, moving from hole to hole, smoothing out the edges of the design. Continue cutting until your design is done.
Note: Power tools, electricity, and other items used for this project can be dangerous unless used properly and with adequate precautions, including safety protection. Please use extreme caution when using power tools and electricity. Always wear protective equipment, and learn to use your tools before you start any project.

Essential pumpkin carving tips for better results
Halloween is such a fun time of the year, and harvesting and carving a pumpkin with friends or your children is a great activity that all will love to share.
Done incorrectly, you will have a lopsided design that rots before Halloween arrives. Done correctly, though, you will have a creation that you will happily display for all to view and admire.
Never fear, these expert carving tricks will have your pumpkins looking and smelling good for the entire trick-or-treating season.
Don’t carve the pumpkin too soon
Pumpkins will last a long time without going bad as long as you keep them whole. You can purchase one early to make sure that you get the shape you want.
But once you have carved the pumpkin, it will slowly start to go bad. If you can, wait until 24 hours before you wish to display the pumpkin; it will stay intact best.

Choose the right opening size
It is important to cut an opening in the top (or bottom) of your pumpkin just large enough to get your hands in to scoop out the pulp and seeds but not so large that the top will cave in later. You can make the opening round, or get fancy and use an irregular shape.
Be sure to replace the top piece that you cut out to use as a lid for your finished pumpkin design. This not only completes the look but keeps the light inside the pumpkin.
Cut the lid at an angle
When you make your opening for the top, don’t cut straight down into the pumpkin. Pumpkin flesh shrinks in size as the carving ages, and the top will fall in on itself if you cut straight down.
Instead, cut the opening at an angle. This makes the outer area wider than the inside, which will keep it in place.

Consider cutting the opening from the bottom
If you don’t want to wrestle with getting a lit candle down into the pumpkin (or struggling to light the one that is in there), cut the opening from the bottom!
- Cut a hole in the bottom of your pumpkin, remove that piece, and discard it.
- Most of the seeds and loose inside flesh will come away with the piece
- You will only need to give your pumpkin a quick scrape on the inside.
Cutting the hole from the bottom also means that you can make use of all the top area of the pumpkin for carving, and you won’t need to worry about the top shrinking and falling in.
Cutting from the bottom also means that you will get a nicely smooth and finished design.

Tips for removing pumpkin seeds and pulp
Before you can carve a pumpkin, you will need to remove the seeds. This is normally the messiest part of the whole job.
- Using your hands and a scraper, scoop out the pulp and seeds of the pumpkin.
- Be sure to have some sort of container nearby for the scraps.
- You can also place the pumpkin on some newspaper so you won’t make a mess.
- The wall of the pumpkin should be about 1 inch thick when you are done.
- If you make the walls too thin, the pumpkin may rot before Halloween arrives.
- Thicker skins also take the heat of the candle inside better, too.

Save the pumpkin seeds
Save the seeds to roast later. They are delicious and make a great healthy snack. Here is a recipe for toasted pumpkin seeds that has some different varieties of seasonings for you to try.

Look for unusually shaped pumpkins
We all love the look of a traditional round pumpkin that is so commonly seen, but opting for a weirdly shaped pumpkin can give you all sorts of ideas for designs and room to execute them.
Even knucklehead pumpkins with all their warts and other heirloom pumpkins are candidates for more advanced carving techniques.

Try scraping instead of carving
Some of the most interesting designs are made without cutting all the way through the pumpkin. This is called scraping.
Scraping the first layer of the outer shell opens up all sorts of design possibilities, like the realistic-looking design of human faces above.
Linoleum block cutters make ideal pumpkin shell scrapers. They have a V-shaped blade, and you can purchase them online or at art supply stores.
Use toothpicks to repair broken pieces
Whoops! We’ve all been there. Your design is almost done, and you make a mistake with your knife and cut off an essential part of the design.
Don’t worry – if you have some toothpicks, you will be fine. Just secure the pieces that have broken off by poking a toothpick into them and attaching them to nearby flesh.

Keep your carved pumpkin cool
There is not a lot that you can do to add weeks of life to your carved pumpkin, but there are a few things that will add days to the amount of time it lasts.
- When you are done carving, wrap the pumpkin tightly in plastic wrap and keep it in a very cool place, preferably in the fridge.
- Other places to keep it cool are to leave the carving outdoors at night or in a garage.
Basic pumpkin carving ideas
It’s easy to carve a simple pumpkin face design just by keeping a few pumpkin carving tips in mind and with very few tools.
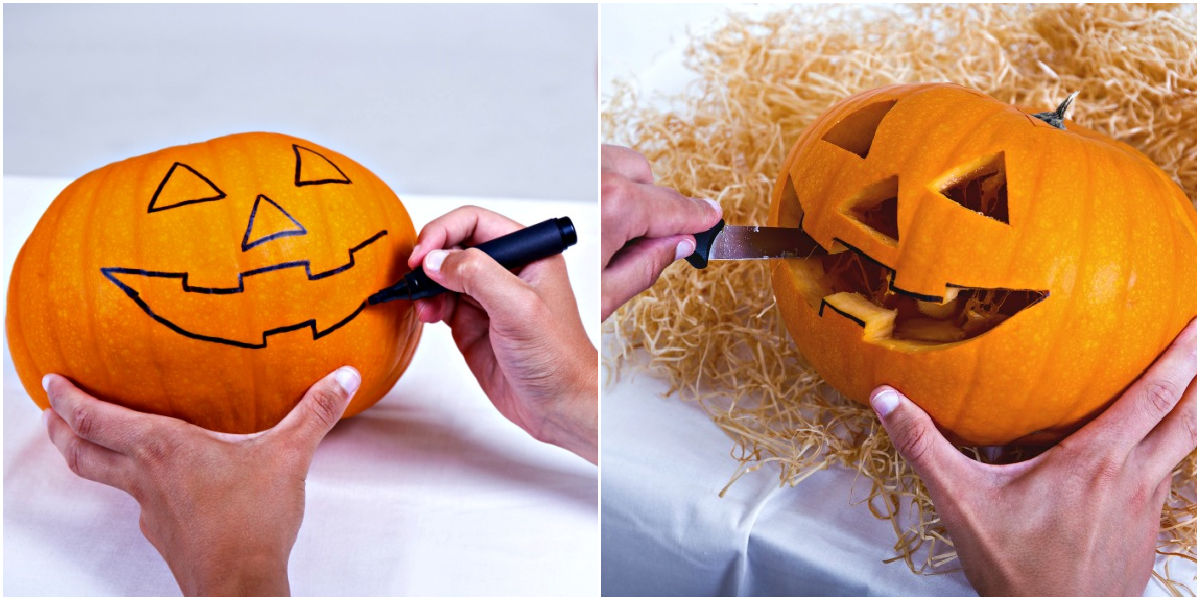
How to carve a simple Jack-O’-Lantern
For a simple pumpkin carving such as a Jack-O’-Lantern, all you need is a sharp knife and a simple design idea.
- Trace your design on the outside of the pumpkin with a marker.
- A plain design like triangles for a nose and eyes and a bit more elaborate mouth will work just fine.
- Or you can trace something more intricate if you are artistically inclined.
- Once you have the design traced, use a sharp kitchen knife to cut the design from the outside to the inner area.
Tip: a dry-erase marker is better than using a Sharpie pen. If you make a mistake when you trace the pattern, it will be easier to remove the mark and begin again with dry-erase marks than with permanent marks.
Advanced pumpkin carving techniques and creative ideas
With the basics perfected, it is time to move on to some more elaborate pumpkin carving. To get a more professional look, there are some tools and techniques that will make the task easier.

Using cookie cutters as a design aid
If you would like something a bit more elaborate but don’t have the time or patience for a stencil, use a metal cookie cutter. Cookie cutters for Halloween come in all sorts of shapes and sizes.
- Push the cookie cutter into the pumpkin shell.
- This will pierce the shell with your desired shape.
- Then you can finish the carving with a knife.

Using pumpkin carving stencils
Even though you can just cut pieces out of the pumpkin to make a basic Jack-O’-Lantern design, using a more elaborate pumpkin stencil will allow you to carve pumpkins worthy of any pumpkin carving contest.
- Place your stencil on the pumpkin and attach it with some tape.
- If it does not fit smoothly, make small slits in it and tape it down on the pumpkin.
- Using a stencil will give you designs with more rounded shapes and more intricate looks than a basic triangle face design.

Don’t be afraid of using stencils, thinking only master pumpkin carvers can use them. Some stencils are quite simple, and others are for those who don’t mind taking hours carving their creations.

Think beyond the traditional Jack-O’-Lantern face
Don’t be afraid to get creative. We all know how common a pumpkin with a Jack-O’-Lantern face on it is, and many people only carve this way. However, with a bit of thinking outside the box, you can go way beyond this in terms of creativity.
- Bats, ghosts, witch hats, and other scenes all look great on a carved pumpkin, and with stencils, these are easy to do.
- One of the tricks is to make sure that there is plenty of shell left between the areas you cut out of the design.
- If you try to carve too tiny a design all over the pumpkin, you risk having it cave in on itself.
In the simple design above, a black cat stencil made it easy to carve out the main area. The moon was made by shaving only the outer shell into a moon shape and leaving the flesh behind. The effect is great!

Add to a pumpkin carving with props
If you don’t have the desire or time for an elaborate pumpkin carving, dress up your basic designs with simple props.
Props allow you to turn a basic pumpkin carving into something a bit more creative. Glitter, sequins, and corn stalks all change the look of a pumpkin face. Even adding a fun hat will change a very simple carved face into a really whimsical design.

Make a pumpkin mouth with toothpicks
Toothpicks not only hold broken pieces together, but they can be part of the design.
- To make toothpick pumpkin teeth, first carve a simple Jack-O-Lantern.
- Position the toothpicks in the mouth of the pumpkin at angles so they cross.
- Instant teeth!

Create a chimney in the pumpkin
Once you have carved the pumpkin, it is time to make a chimney in your pumpkin to release the heat. Without a chimney, you’ll make a mess on the inside and encourage the pumpkin to rot more quickly.
- Light a candle, place it inside the pumpkin, and put the lid back on.
- In a few seconds, blow out the candle and see where the dark side is on the inside of the lid.
- This is the place where you will cut a small hole with your drill or a knife.
- When you have cut this hole, the smoke will release through it so the heat can escape the pumpkin while the candle is glowing inside.
To prevent a hot heat source, use other types of light sources such as LED lights instead of candles. These lights get really bright but they don’t give off a lot of heat. This will allow the pumpkin to stay cooler on the inside.

Keep a spray bottle handy while carving
You know what happens to apples and avocados once they are cut. They go brown because of oxidation. Once pumpkins are cut, they will start to rot.
- Pumpkins lose a lot of moisture while we are carving them.
- Having a water bottle handy while carving will help it to stay workable.
- Spray the pumpkin occasionally as you carve it.

Combine pumpkin sizes
Pumpkins come in all shapes and sizes. Get creative by using this to your advantage in your carving.
In the photo above, one side of the mouth on the large pumpkin is enlarged to fit the size of the similarly carved smaller pumpkin. It gives the impression of one pumpkin eating the other!

Use leftover pumpkin pieces creatively
When you are finished with your design, you’ll likely have some pieces of pumpkin left over. Don’t throw these away! Put them to creative use.
- Use the seeds to make a grotesque-looking “night after pumpkin.”
- Carve leftover pieces to make a tongue or a pipe.
- You can also make hair pieces out of a discarded piece of pumpkin shell, for a unique look.

Don’t forget to carve gourds
It is not just pumpkins that can be carved. Members of the squash family have similar structure and shape and work well.
- Gourds and butternut pumpkins also have hard skins and soft flesh that make them ideal candidates for carving projects.
- The fun thing about gourds is their unusual shapes.
- Instead of being large and round, gourds often have a large lower area and a taller top, which gives them a totally different look when carved.
- When carving gourds, start the carving below the slim area of the gourd and just consider the top part as though it is the stem. This gives you room to reach inside when working.
Looking for more inspiration? Explore these creative pumpkin carving ideas for unusual, funny, and eye-catching designs to try this Halloween.

Pumpkin carving FAQs
I have covered quite a few details about pumpkin carving, but these are some common questions that I receive from readers.
How long will a carved pumpkin last? – The short answer is really not that long. It depends on how open the carving is and how much air gets to it. Most pumpkins will last about 2 weeks. However, if yours has less air circulating it, you will likely start to grow mold after a week.
How can I keep a carved pumpkin from growing mold? – Soaking the carved pumpkin in a tub of cold water will make sure that it stays hydrated. If you add a bit of bleach to the water, this will help to prevent mold.
Petroleum jelly rubbed all over the edges of the carved pumpkin (both inside and out) also helps to deter mold.
How long before Halloween should I carve my pumpkin? – Pumpkins rot quickly, so it’s a good idea to carve as close to Halloween as you can, but no longer than 5-10 days ahead of time.
How can I keep my pumpkin carving cool? – If you live in a cool location, place your pumpkin outside on your porch. The cool autumn temperatures will help it last longer.
You can also wrap the pumpkin in plastic and place it in the fridge.
How do I get a nice smell in a carved pumpkin kept indoors? – Sprinkle the inside of the carved pumpkin with cinnamon, nutmeg, and cloves, and you’ll be able to use the pumpkin as an autumn-flavored air freshener.
Adding a small scented candle in a glass container as your light will also give off a nice scent.
Share this guide to carving pumpkins on X
If you enjoyed this post, why not share these pumpkin carving tips with a friend?
🎃 Ready to carve the perfect Jack-o'-lantern? These pumpkin carving tips will help you choose the right pumpkin, use your tools, and create a spooktacular Halloween design! 👻🕸️#PumpkinCarving #Halloween #HalloweenDIY #FallFun Share on XPin these tips for carving pumpkins for later
Would you like a reminder of this post for my pumpkin carving tips? Just pin this image to one of your favorite Pinterest Halloween boards so that you can easily find it later.
Admin note: This post about pumpkin carving tips first appeared on my blog in October of 2015. I have updated the article to add new pumpkin carving tips, new photos, and a video for you to enjoy.
Pumpkin Carving Tips and Tricks - How to Carve a Pumpkin Easily
One of the fun parts of Halloween is having that perfectly carved pumpkin. These pumpkin carving tips will help you make yours very spooky and fun.
Materials
- 1 pumpkin
Tools
- A sharp knife
- A poker
- A Drill
- A Saw
- A Scooper (an ice cream scoop also works just fine)
- Linoleum block cutter
- Toothpicks
- Spray bottle
- Metal cookie cutters
Instructions
- Cut off the top of the pumpkin so that you can see the seeds inside. Set the lid aside to use later.
- Use the ice cream scoop or other scooping tool to remove the pulp and seeds. (be sure to save the seeds to roast later.)
- For designs that use the top area, make the cut out on the bottom and remove the guts along with the cut piece.
- Attach a stencil or draw the design you want on the front of the pumpkin with markers.
- Use the poker to make small holes all along the design of your pattern.
- Once you have done this, you can remove the pumpkin stencil and save it so that you have something to look at for when you start to carve the pumpkin.
- Holding the pumpkin in your lap, use the drill to make larger holes through the pumpkin over the small holes. This will get the design through to the center of the pumpkin
- Once you have your design in place, use the saw to cut out larger pieces of pumpkin to finish the design.
- Cookie cutters can also be used to press design patterns.
- If more intricate designs are desired, use a linoleum block cutter to shave the outer shell instead of cutting holes for the design.
- Use toothpicks to secure any broken pieces.
- Keep a spray bottle filled with water nearby and use it to keep the flesh moist.
- Place a candle in the cleaned out pumpkin and light it. Replace the lid and allow the candle to light for a few minutes.
- Blow out the candle and look to see the dark area under the lid. This is where you need to cut a chimney so the smoke will release through the top.
- Use the knife or saw to cut a chimney for the pumpkin in this part of the lid.
- Light the candle, replace the lid and display.
- Keep the carved pumpkin in a cold place, outdoors or wrapped in the fridge.
Notes
Be sure to place the pumpkin on a plate if you display it inside. Carved pumpkins will deteriorate quickly and will make a mess under them if you don't protect the furniture.
It is best to carve the pumpkin close to the time that you will display it for this reason.
Recommended Products
As an Amazon Associate and member of other affiliate programs, I earn from qualifying purchases.





Great tips for carving pumpkins this Halloween season!
Halloween is a big holiday in the USA.