
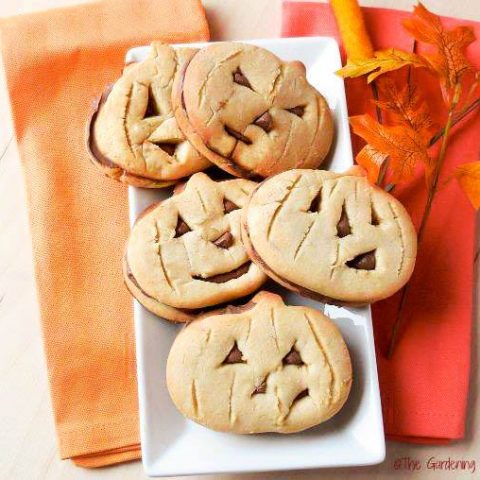
These Halloween pumpkin face cookies are the perfect Halloween recipe for your family or neighborhood friends. They have a cute Jack O Lantern pumpkin face and are filled with rich chocolate frosting.
Imagine the delight at your Halloween party or when you surprise your trick-or-treaters with some pumpkin Halloween cookies. Just wait for the squeals!
These Halloween pumpkin cookies are soft-baked and chewy. The cookies are shaped and decorated to look like mini pumpkins. They are the perfect treat for Halloween parties and snacks for fall.
Keep reading to learn how to make a Halloween cookie that is as much fun to make as it is to eat.

The Gardening Cook is a participant in the Amazon Affiliate Program. This post may contain affiliate links. I earn a small commission, at no extra cost to you if you purchase through an affiliate link.
Ingredients for the Halloween pumpkin face cookies
To make these Jack O Lantern cookies, you’ll need the following supplies: I love this time of the year.
For the cookies:
- 1 ½ cups unsalted butter, at room temperature (3 sticks)
- 2 cups of granulated sugar
- 4 eggs
- 1 teaspoon of vanilla extract
- 5 cups of all-purpose flour
- 2 teaspoons of baking powder
- 1 teaspoon of salt
For the frosting:
- ¼ cup unsalted butter
- 3 tablespoons of cocoa powder
- ¼ cup of skim milk
- 2 cups of confectioner’s sugar
- 1 teaspoon of pure vanilla extract
- Green sparkle gel for the stem (optional)
You’ll also need a mixer, a baking sheet, a silicone mat, and some pumpkin cookie cutters.
Making the Halloween pumpkin cookies
Combine the all-purpose flour, baking powder and salt in a large mixing bowl. Whisk well, and set the dry ingredients aside.

Add the granulated sugar and butter to the bowl of a stand mixer. Mix at medium speed for 2 minutes until smooth.
Beat in the eggs and pure vanilla extract for another 2 minutes until the mixture is light and frothy.
Stir in the flour mixture, a little at a time. Beat for 2 minutes until the flour is well combined. The mixture will be thick.

Wrap the dough in plastic and place in the refrigerator for at least one hour to chill.

Preheat the oven to 400º F (200º C).
Roll out the chilled dough on a floured surface to a ¼ to ½ inch thickness. It’s important to chill the dough well, since it contains so much butter.
Be sure to roll the dough so that it’s not too thin. The faces are easier to cut if the dough is on the thick side.

Cut the dough into pumpkin shapes using a cookie cutter. Score the dough lightly with a sharp knife so that the shaped resemble pumpkins.
Cut eyes, noses and mouths with the sharp knife from 1/2 of the cookie shapes. Reserve the other half of the cookie shapes for the bottom of the cookies.
The openings on the face will allow the chocolate frosting to show through when assembled and will give the cookie a fun Jack O Lantern look.

Line a baking sheet with a silicone mat. a silicone baking mat on a cookie sheet. Place all of the pumpkin shapes on the mat.
Bake in the preheated oven for approximately 6 -8 minutes or until the cookies start to turn a light golden brown on the edges.

Remove the baking pan from the oven and transfer the cookies to a wire mat. All them to cool for at least 15 minutes before you add the frosting.

Adding the frosting to the pumpkin cookie shapes
While the cookies are cooling, you can make your icing. Melt the butter in the microwave, then stir in the cocoa powder.
Add the milk and vanilla extract, and whisk until the butter is frothy. Make sure the cocoa powder is very well dissolved.
In a stand mixer beat the powdered sugar into the butter and milk mixture, a little at a time, until it is fully incorporated.
The frosting should be thick but spreadable. If it is too runny, add more powdered sugar; if it is too stiff, add in a teaspoon of milk.

Spread somce chocole frosting on the plain bottom pumpkin shapes.

Put the cookie with the pumpkin face on top and squeezethem together so the frosting comes up through theholes in the face.
This gives the cookies the traditional Jack-O-Lantern look.
For a bit more color, use some Wilton green sparkle gel to decorate the stem area.

I love the way these pumpkin face cookies came out. You can play with the cuttings on the cookies to give each one a slightly different look.
They have a bunch of emotions, from happy to perplexed to grumpy!

How do the pumpkin cookies taste?
In a word, YUM! The sugar cookie is soft-baked and chewy, and the chocolate icing gives a rich finish to every bite. They are a double dose of sweet goodness.
They are perfect for your next Halloween party!

Share this Halloween pumpkin face cookie recipe on X
If you enjoyed making these Jack O Lantern cookies, why not share the recipe with a friend? Here is a post to get you started:
It's double the fun with these Spooky Halloween Pumpkin cookies with a chocolate center. Find out how to make them on The Gardening Cook. 🎃🎃 Share on XPin these cute frosted pumpkin cookies for later.
Would you like a reminder of the recipe for these Halloween pumpkin cookies? Just pin this image to one of your Pinterest Halloween boards so that you can easily find it later.
Admin Note: This post for these spooky Halloween cookies first appeared on the blog in September 2015. I have updated it to add new photos, a printable recipe card, and a video for you to enjoy.
Spooky Halloween Pumpkin Cookies
These spooky Halloween pumpkin cookies have a double cookie layer and luscious filling. Make some for your Halloween party table today.
Ingredients
For the Cookies
- 1 ½ cups unsalted butter, at room temperature
- 2 cups of granulated sugar
- 4 eggs
- 1 teaspoon of pure vanilla extract
- 5 cups of all-purpose flour
- 2 teaspoons of baking powder
- 1 teaspoon of salt
For the Frosting
- 3 tablespoons of cocoa powder
- ¼ cup of skim milk
- 2 cups of confectioner's sugar
- 1 teaspoon of pure vanilla extract
- Wilton green sparkle gel frosting (optional)
Instructions
- Combine the flour, baking powder and salt in a bowl. Whisk to combine and set the dry ingredients to one side.
- Add the butter and sugar to the bowl of a stand mixer and mix at medium speed until they are smooth - about 2 minutes.
- Add the eggs and pure vanilla extract and beat 2 more minutes.
- Add the flour mixture, a little at a time, until they are well incorporated.
- Wrap the dough in plastic and place it in the fridge for at least an hour.
- Preheat oven to 400ºF (200ºC). Roll out the dough on a floured surface to a ¼ to ½ inch thickness.
- Cut your dough into pumpkin shapes using the cookie cutter.
- Use a sharp knife to lightly score the dough so that it looks like a pumpkin.
- Cut decorative, spooky faces from ½ of the cookie shapes. Leave the others plain.
- Line a cookie sheet with the silicone baking mat and place your cookie shapes on the mat.
- Bake for approximately 6-8 minutes or until the cookies start to turn a light golden brown on the edges.
- Remove the baking sheet and place the cookies on a wire rack. Cool for at least 15 minutes before assembling the cookies.
While the cookies are cooling, prepare your icing.
- Melt the butter in the microwave, then stir in the cocoa powder.
- Add the milk and vanilla extract, and whisk until frothy. Make sure the cocoa powder is very well dissolved.
- In the bowl of a stand mixer with a beater attachment, add the powdered sugar to the butter mixture a little at a time until it is fully incorporated. The frosting should be thick but spreadable. If it is too runny, add more powdered sugar; if it is too stiff, add in a teaspoon of milk.
- Spread the plain bottom pumpkin with chocolate frosting. Place the decorative pumpkin face cookie on top and squeeze so the frosting comes up through the face holes.
- For a bit more color, use Wilton green sparkle gel to decorate the stem area.
Recommended Products
As an Amazon Associate and member of other affiliate programs, I earn from qualifying purchases.


Nutrition Information:
Yield:
18Serving Size:
1 cookieAmount Per Serving: Calories: 427Total Fat: 17gSaturated Fat: 10gTrans Fat: 0gUnsaturated Fat: 6gCholesterol: 82mgSodium: 196mgCarbohydrates: 63gFiber: 1gSugar: 36gProtein: 5g
Nutritional information is approximate due to natural variation in ingredients and the cook-at-home nature of our meals.
Michelle Coles
Thursday 1st of October 2015
I have never used Silicone products before but I do bake alot of cookies and would love to try it out!
admin
Thursday 1st of October 2015
You will never look back once you have tried them!
Candie L
Thursday 1st of October 2015
I would use it for delicious home made peanut butter cookies. Thank you
admin
Thursday 1st of October 2015
Yum...my favorite!
Rita A
Thursday 1st of October 2015
I mostly have silicone spatulas and not much else.
admin
Thursday 1st of October 2015
Hope you win a mat too!
Leah Shumack
Thursday 1st of October 2015
I love silicone baking pans! We use them for sugar work, cakes and even have some sets that we use for crayons!
admin
Thursday 1st of October 2015
Never thought of using them for crafty stuff and crayons!
John H.
Thursday 1st of October 2015
For making pie crust
admin
Thursday 1st of October 2015
That is one thing that I just started doing and it works great. Doesn't stick at all!