
Creating a gingerbread house for the holidays is a fun Christmas activity that the whole family can enjoy. These gingerbread house tips will help you build a sturdy house that holds together and looks amazing.
From using muffin tins to hold your candy supplies to choosing the best icing, these steps will make building a gingerbread house quick and easy. A little preparation will ensure great results from the first wall to the finished holiday house.
Follow our step-by-step guide below to design windows, trees, and fun details that will bring your gingerbread house to life. With a few smart tricks, you’ll end up with a professional-looking holiday creation that everyone will admire.

Some of the links below are affiliate links. I earn a small commission, at no additional cost to you, if you purchase through an affiliate link.
Supplies for gingerbread house decorating
Whether you baked your own gingerbread or are using a pre-made kit, you’ll need a few tools and decorations to bring your holiday house to life.

Icing and structural materials
- Royal icing -for “glue” and decorative piping
- Icing bags and tips – for detailed designs and seams
- Frosting knife – to smooth the icing
- Cans – to support the walls until the icing dries
- Cardboard – a base to build on
Supplies and tools for decorating
- Assorted candies: gumdrops, candy canes, chocolate pieces, sprinkles, peppermints, gummies, mini marshmallows
- Food coloring – to tint the gingerbread house frosting for decorative accents
- Sprinkles – to decorate trees for your gingerbread house
- Tweezers – to place small candies
Optional supplies and extras
- Fondant – to make sculpted details
- Ice cream cones – for creating trees
- Sugar duster – to create a “snow” effect
Tip: Set everything out before you start decorating. It is much easier when everything is within reach.

Quick gingerbread house supplies checklist
This checklist will ensure you have the materials you need before you start building.
- Royal icing
- Piping bags & tips
- Frosting knife
- Assorted candies
- Food coloring
- Tweezers
- Confectioner’s sugar
- Piece of cardboard
- Cans
- Waffle cones (optional)
- Fondant (optional)
If you would like a festive, easy-to-use version of the supplies list while you decorate, you can download this gingerbread house decorating checklist. It mirrors the checklist above and makes it simple to track your supplies.
Download the printable checklist PDF here.
20+ gingerbread house tips
Making gingerbread houses is a holiday tradition in our family, full of laughter, frosting mishaps, and lots of creative fun. These 20+ tips will help you build a sturdy, festive, and truly delightful gingerbread house for your family.

Before you start building the house
A little preparation goes a long way toward keeping your gingerbread house sturdy and beautiful. Here’s what to know before you start.
Decide on the design
Before you start building, decide on the type of gingerbread house you want to create. Whether it’s a simple cottage, a bustling village, or something more whimsical like a gingerbread train, the possibilities are endless!
Consider the space you have for display. There is no point in spending the time to make a grand gingerbread village if you only have room for a small 9-inch cottage.
Once you’ve chosen your theme, sketch out your ideas and think about the type of candy you’ll need for decorating.

Choose a cool, dry day
Gingerbread is very susceptible to moisture. Humidity can soften the gingerbread and make the icing slide. Pick a cool, dry day to help your gingerbread house stay sturdy.
Kit or homemade?
You can use a gingerbread house kit or bake your own gingerbread, but for at least one season, try making it from scratch. Imagine the delight when your family learns that every piece was handmade!

Assemble the gingerbread supplies and tools
Gather everything you’ll need before you start:
- Cooled gingerbread house pieces
- Royal icing and piping bags
- Unwrapped candies
- Spatulas, toothpicks, and a sturdy base
- Food coloring and extras such as fondant
- Powder sugar duster
A muffin tin is perfect for holding all the candy and toppings—everything stays within reach, making your gingerbread house come together more quickly.

Best candy for gingerbread house decorating
If you are using a gingerbread house kit, it will give you everything you need to make a house. However, with a bit of creativity, you can turn simple designs into more professional-looking gingerbread houses.
From edible glitter to striped gum, here are some of my favorite options that add color and fun to your gingerbread house.
- Edible glitter – Use this to give your gingerbread house a magical look.
- Pretzels – Use these to give your gingerbread house design a log cabin look.
- Ribbon candy – Stick these together to form unique striped Christmas trees to stand near your house.
- Candy canes – These make great porch supports and front door decorations.
- Mini marshmallows – Use them in any number of ways to resemble snow.
- Chocolate pieces – Add texture to your design.
- Shredded coconut – This gives the look of snow for the house and surrounding areas.
- Peppermints – Great for roof patterns or decorative walkways.
- Striped gum – Change the look of your gingerbread house with pastel-colored “shingles” with these sticks.
Keep soft candy in airtight containers until you are ready to use it. Store chocolate in a cool spot to prevent melting.

Making royal icing
The best icing for a gingerbread house is royal icing. It dries hard, holds walls together, and secures decorations in place—perfect for edible houses. Here’s my royal icing recipe.

Tips for using royal icing
- Use a stiff consistency to hold walls and roof sections firmly together.
- Pipe the icing directly onto the edges and seams for a strong bond.
- Use a toothpick to seal icing bags to prevent them from drying out.
- A small fan will speed up the drying process once the icing is used on the house.
Tip: Keep the icing covered with a damp towel or plastic wrap when not is use to prevent it from drying out. If it starts to harden, add a little water and stir to bring it back to the right consistency.

Tinting the royal icing
Many gingerbread houses use only white icing with no color, but there are times when you may want to color your icing for special touches, such as stars or wreaths. You can choose between gel food coloring and liquid food coloring. Pros and cons of the two:
- Gel food coloring gives bright colors with a minimal amount of dye. This is the type that I prefer.
- Liquid food coloring needs to be more concentrated in the icing to get the deep Christmas colors. It can also thin out the royal icing.

Gingerbread house construction tips
Now that you have all your gingerbread pieces and royal icing ready, it’s time to start building! Follow these steps to ensure your gingerbread house is strong and stable, ready for all those beautiful decorations.
Cut a sturdy base
Before you start building the gingerbread house, it’s important to have a solid base for it to sit on. The base will give you a working area and ensure that the house doesn’t fall over as you build it.
What you’ll need:
- Gingerbread house base ideas – a cake board, a thick piece of cardboard, or a thick foam board
- A sharp knife or scissors – to cut the base to size
- Decorative paper or cellophane – to cover the base when you finish building the house
How to make the base:
- Cut the base, making sure it is larger than your house. A good rule of thumb is to allow 2-3 inches of space around the house for decorations.
- When you are done building, you can cover the base with the decorative paper to make it look more festive.
- Be sure the base is level. You want it to be as flat and sturdy as possible so your house won’t wobble during assembly.

Decorate the pieces before you assemble the house
If you assemble the house first, it can be awkward to decorate it, particularly the lower edges.
An easy trick is to decorate the front, back, and sides of the gingerbread house before you assemble the house.

Building the gingerbread house
Now that you have decorated the sides, front, and back sections, it’s time to assemble the house.
- Pipe royal icing along the front and one side piece to create a seam.
- Repeat with the back and the other side piece.
- Join the two sections together to make a box shape.
- Let the icing harden in place for 15-30 minutes.
- Glasses or cans inside the structure will help to hold the pieces upright as the royal icing hardens.
- Join the two roof sections with royal icing and position them over the top of the house, extending them over the edges to make eaves.
- Untidy seams can be hidden later with more icing in the form of icicles or by adding extra candy over them.
You can use as much icing as you need on the inside of the house. No one sees this part and it will make the house structurally more sound.

What to do about uneven sides?
The perfect gingerbread house fits together perfectly with straight edges.
Baking gingerbread in the oven means that the pieces you cut may “spread” a little while baking and have some slightly rounded edges.
If this happens to your pieces, a microplane grater will file down the edges evenly and smoothly. Sand any uneven edges with the grater until they are smooth.
Note: don’t use sandpaper if your house will be edible.
How long does it take to make a gingerbread house?
Making a gingerbread house takes time and patience. A good gingerbread house can’t be made in just a few minutes.
- To harden completely, the icing needs to be set for at least a few hours and sometimes overnight.
- If you plan to bake your gingerbread from scratch, you will need one extra day for rolling, cutting, and baking.
- One day will be needed to make the pieces, and one to decorate the gingerbread house.
Remember, a big part of the joy of a gingerbread house project is the time spent with family creating it. Enjoy the journey!

Decorating touches
Once the structure is finished, the real creativity begins! To give your gingerbread house some extra character, incorporate some of these ideas into your design.
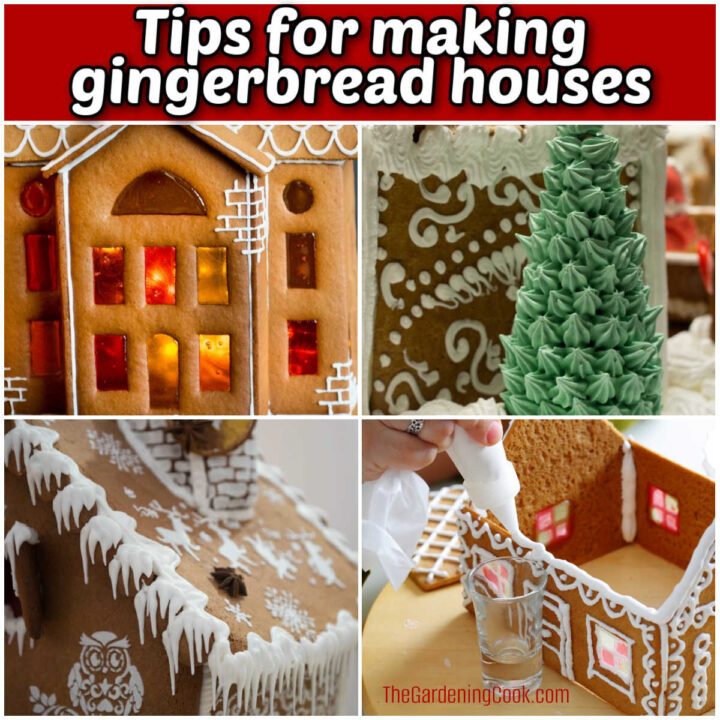
How to make stained glass windows
Stained glass windows add a decorative touch to your house. Here is how to make them:
- Crush hard sugar candy and arrange it in small piles on a silicone mat.
- Bake at 250°F (120°C) for 6-8 minutes until the colors run together and the candy is melted.
- Score the pieces of melted candy with a pizza cutter while still warm, and then cut them to fit in your window openings.
- Allow the pieces of melted candy to cool.
- Use some royal icing to attach the “stained glass windows” inside the window openings of your gingerbread house.
Note: If you don’t want to bake the candy, cut pieces of Fruit Rollups to the shape you need. They will also give a semi-stained glass effect to the windows.

How to make a shingled roof
This type of roof gives your gingerbread house an English cottage look. Here is how to make a shingled roof:
- Use royal icing to attach pieces of Golden Grahams, Shredded Wheat, or Chex cereal to the roof sections of your gingerbread house.
- You can place the cereal pieces close together in even rows, or overlap them to create shingles.
- Dust the roof with powdered sugar to make it look like it is snowing.
- Cover the sides of the roof section with royal icing to hide the edges of the Life cereal.

How to make a gingerbread chimney
A chimney adds extra dimension to your gingerbread house and is easy to do. Follow these steps:
- Cut four small rectangular pieces of gingerbread.
- Use a sharp knife to cut a triangular piece out of two of them to fit the peak of your roof.
- Use royal icing to join all four pieces into a box shape with the cut-out pieces facing down.
- Add royal icing to the bottom edge pieces of the chimney “box”.
- Position the chimney over the top of the roof, with the notched edges facing the roof peak.
- Push to secure the chimney and let the icing harden to set.

How to make icicles for a gingerbread house
Icicles add a professional look to the roof of your gingerbread house. Here is how to make them:
- Place a #2 piping tip at the end of your icing bag.
- Add a few tablespoons of milk to your royal icing to thin its consistency.
- The icing should drip slightly from the edges of your gingerbread house.
- Once you have the right consistency, pipe the icicles to the edges of the roof sections.
Icicles give the roof area a delicate look, and also hide any seams that might be visible.
How to add fallen snow
The perfect gingerbread house has character. Nothing sets the scene for a winter scene more than fallen snow.
Add the look of freshly fallen snow by using a sugar duster or small sieve to sprinkle the house with the confectioner’s sugar.
Finishing touches
All gingerbread houses are pretty, but you can add some special touches to make yours stand out from the crowd.
How to make lamp posts
Making lamp posts is one of the easiest decorations! All you need to do is add a gumdrop to the end of a cake pop stick.
Instant lighting! What could be easier to do? They take all of one second to make!
How to make ice cream cone trees
Don’t stop with just the house. Get creative with some ice cream cone trees.
- Place a #18-star icing tip into the end of an icing bag.
- Add a drop of green gel icing to some gingerbread house icing, then stir it to make a light green color.
- Place the icing into the bag with the star tip.
- Start at the bottom of the ice cream cone and press out star shapes until the whole cone is covered.
- If you don’t have icing tips, you can make trees by covering them in gingerbread house royal icing and rolling them in green sprinkles.
These edible trees are a delight to see and to eat!
Find a safe spot for display
Once your gingerbread house is complete, choose a display location that keeps it safe from both pets and heat.
One of the funniest (and most frustrating) moments of our gingerbread-making attempts was the year that our dog, Rusty, ate the entire house when we went to bed—right after it was perfectly decorated!
- Choose a cool, dry area away from direct sunlight, fireplaces, or heating vents.
- Too much warmth or humidity can cause the icing to soften and the candy to melt.
- If you have curious pets, place the house on a high shelf or table where it will be visible but out of reach.
- Be sure the house sits on a sturdy tray so that it’s easy to move if needed.

If you’d like to see how a full gingerbread house comes together from start to finish, check out my step-by-step gingerbread house tutorial on my holiday site.
It walks you through baking, assembling, and decorating an entire candy-covered cottage with a lean-to and surrounding yard.

Related gingerbread ideas
Looking for more ways to celebrate with gingerbread this season? Check out these posts—whether you want to learn the history, get some inspiration or bake something sweet, we’ve got you covered!

- The history of gingerbread: This fascinating look shows how this classic treat evolved from cookies to houses and everything in between.
- Creative gingerbread house ideas: Get inspired by 14 festive designs, from candy cottages to a log cabin and majestic Swiss chalet.
- Gingerbread Christmas tree cookies: Bake these chewy bar cookies and decorate them with M&Ms for a fun twist on the classic gingerbread recipe.
Share these tips for making gingerbread houses on X
If you enjoyed these gingerbread house tricks, why not share them with a friend? Here is a post to get you started:
Gather some candy, put on an apron, and head to your kitchen. It's time for some tips for making the perfect gingerbread house. #gingerbread #christmas #DIY 🤶🎄🎅 Share on XPin these gingerbread house tips and tricks for later
Would you like a reminder of this post about how to make the best gingerbread house? Pin this image to one of your Christmas boards on Pinterest.

Admin note: These tips for the perfect gingerbread house first appeared on the blog in December 2015. I have updated the post with new photos, a supplies for gingerbread house checklist, a slideshow video, and a printable instructions card.
Tips for Making Gingerbread houses
Making a gingerbread house is one of the best parts of the holiday season.
These tips will help you to create a magical gingerbread house with a professional look.
Materials
- Gingerbread house pieces
- Royal icing
- Candy to decorate your house
- Gel food coloring
- Ice cream cones
- Shredded coconut
Tools
- Piping bags and tips
- Tweezers and toothpicks
- Frosting knife
- Sugar duster
- Sturdy base to build the house on
- Food cans
Instructions
- Plan your design. Sketch your ideas and suggestions for decorations.
- Make a base. Be sure it is level and solid so the house is stable as you work.
- Make the royal icing. Also, add food coloring to small bowls of royal icing to use for decorating. Cover all of the bowls so the icing doesn't dry out.
- Assemble the house. Pipe along the seams and allow the royal icing to dry. Food cans help to hold the house in place.
- Decorate the gingerbread house. Add stained glass windows, shingles, icicles, and other decorative touches. Let your creativity flow.
- Add colored icing decorations. Make door handles, a wreath, and a pathway to the house.
- Add yard decorations. Make lamp posts, add ice cream cone trees, and place festive ring pops for outdoor decorations.
- Add some snow. Use shredded coconut, powdered sugar, and mini marshmallows to add a snow effect.
Notes
- Keep soft candy in airtight containers until you use it.
- Display the finished house in a cool, dry spot away from pets and heat.
- Bonus: Download a supplies checklist printable for a handy reference while you work.
Recommended Products
As an Amazon Associate and member of other affiliate programs, I earn from qualifying purchases.


