
I have a garden bed in my front yard that I call my “Jess border.” The reason for the name is because my daughter and I made the bed together and it always has a big patch of sunflowers in the middle of it each year. Sunflowers are Jess’ favorite flowers.
 Like all my other garden beds this year, it had become over grown with weeds. I tidied it up and added composted leaf mulch but the biggest concern was the edging. No matter how often I trench it around the edge, there is one weed which grows into it from our
 lawn cover of weeds. (It’s green and looks like a lawn but grass is the least common denominator in it!)
I did not want to keep trenching it over and over, so I invested in some Vigaro edging strips. I have used them in other areas of the garden and they make a great edge to trim up to with a whipper snipper and keep the weeds out well. Add to that, the edging has a scalloped edge which is quite attractive.
The edging strips are reversible and interlock with each other in 6 inch pieces. The complete set is 20 feet long. I bought mine at Home Depot for about $14 for 20 feet. It took two boxes to edge this border.
 To do the project, you will also need a rubber mallet. (affiliate link) The mallet knocks the plastic edging pieces into the ground but does not damage them in any way.
I bought one several years ago and use it all the time to knock in both this type of edging as well as plant stakes and other plastic garden upright items.
 This is the way my edges looked before I started. This one weed is vigorous and I had trenched this edge just about a month and a half ago. It was over grown on all sides of the border.
 First I used the tip of my shovel to dig along the trench edges. It did two things: it gave me a place to put my edging pieces easily and it also cut the weeds off at the edge for easy removal.
  The edging can be inserted in single pieces or your can join it before you insert in and use the rubber mallet. For long straight edges I used four joined pieces. If it had a slight curve, I used a couple of them. It went together more quickly in pairs.
 At the corner areas, I just pounded in one piece at a time. One of the real beauties of this edging is how flexible it is. Longer plastic edging will also curve but you have the whole expanse to work with. These edging pieces come in 6 inch sections and make it very easy to work with.
 Just keep pounding as you go and you’ll end up with a great looking edge which is perfect for keeping the grass and weeds from growing into your border.
 This part of the border is the widest area. The edge looks wonderful here and it rounds the bed beautifully.
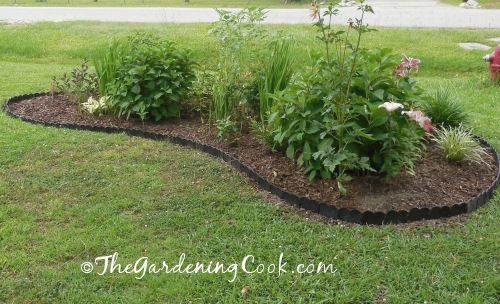 The finished border with edging all around. No more weeds in this border and I won’t have to trench it again! Now I wait for the sunflowers to bloom.
What type of edges do you use for your garden borders? Please leave your comments below.
Peggy
Monday 3rd of October 2022
I too am struggling with flowerbed edges. And WOW! My lawn also quite weedy and looking like grass. I recently did a Completed digging up of weeds, and I can say that it is a GRUELING Job! You have to stay on them because they reseed and creep back into your bed. I will try the Vigaro edging, you mentioned, along with the mulch that’s been in my garage waiting for me!
Brenda
Tuesday 17th of November 2020
Brick paver edging placed at an angle with the point showing upward. This is very pretty and works nicely with black plastic covering the soil then rock of your choice covering plastic. It has been 14 years now and does need redoing. I chose medium brown rock.
12 Simply Beautiful Front Yard Landscaping Ideas to Wow Your Neighbors * My Stay At Home Adventures
Wednesday 3rd of May 2017
[…] You flower beds can take on a whole new look when you learn how to edge a garden bed. […]