
Every morning I take a garden walk to see what is growing and what needs tending. Today, I spent the morning deadheading daylilies.
I have clumps of daylilies – hemerocallis – that have naturalized into plants with numerous blooms on them. Some of them have 12 or 13 blooms out in a day.
Since daylily blooms are short-lived, this can leave you with an untidy-looking plant in no time at all.
Normally, deadheading is a task that I don’t enjoy much. However, deadheading daylilies (and Easter lilies) is very easy, since the blooms flop over when done and are easy to remove. I find this task quite relaxing.

You can also check out this post to learn which plants don’t need deadheading.
How daylilies grow
Daylilies are plants that both beginning gardeners and those who have been at it for a long time appreciate. These pretty perennials require very little attention, grow in almost any sunny location, and are not picky when it comes to soil.
Each daylily plant sends up large strap-like leaves and a tall flower stem called a scape. Multiple buds form on each scape but they don’t open at the same time. Each bud opens and blooms for just one day, which is the reason that the common name for hemerocallis is daylily.
Some types of daylilies will continue to produce new scapes and buds if deadheaded, so they don’t set seed.
If you examine a patch of daylilies, you’ll see that each one is made up of these plant parts:
- Scape – the stalk that produces blooms
- Bud – an immature flower
- Flower stem – the part of the stem that joins the flower bud to the scape
- One day old bloom – droopy watery bloom
- Two-day-old bloom – withered and dry bloom
- Ovary – swollen area of the flower bud at the base where the seed is produced
- Seed pod – enlarged oval, lobed area about 1-2 inches that will dry out and turn brown as the season progresses.

What does deadheading daylilies mean?
Deadheading is the practice of removing blooms from a plant after it has flowered and the blossom is starting to die.
When you deadhead flowers, you change the path of energy. Instead of the plant channeling energy to seed production, you are telling it that you want more flowers.
You basically trick Mother Nature into forming additional flowers. This red vols daylily is such a beautiful flower. Why not get rid of the spent blooms to make it look even better?

Deadheading is quite different from pruning. When you prune a plant, you don’t remove just a blossom, you remove larger parts of a plant, such as the foliage or scapes that the flowers grow on.
We’ll discuss both of these topics in relation to daylilies today.
Should you deadhead daylilies?
Most flowering plants, including daylilies, put out a great deal of energy to produce seeds.
In my garden, starting in late May and through July, these perennials begin their display of lovely blooms. Some re-blooming daylilies, such as Stella D’Oro, will bloom right up until a hard frost.
If you deadhead the entire stalk of this daylily, you’ll get more blossoms than if you leave the stalks to form seed pods, which ripen over the summer and burst in the fall.
However, unless you have a reblooming type of daylily, the blooms will be gone in a few months. So, a common question I get from readers asks, “Is deadheading daylilies really necessary if my plant doesn’t rebloom?”
Finished daylily flowers are not very appealing. The spent flowers quickly turn to a mushy bloom and then dry over undeveloped buds, which can prevent them from opening.

Removing the dead blooms keeps this from happening.
Also, daylilies, which have not been deadheaded, will form seed pods. This seed production takes away from root and shoot development and hampers future flowering potential. Seed pods should be removed so that the plant will produce more flowers in subsequent seasons.
It is not necessary to deadhead daylilies every day. As long as you do this a few times during the bloom period, this should be sufficient to keep the plants from developing mature seed pods.
Also, finished blooms of daylilies are very untidy in the garden. Removing the old blossoms keeps the plant and the general garden area neater.
How to deadhead daylilies
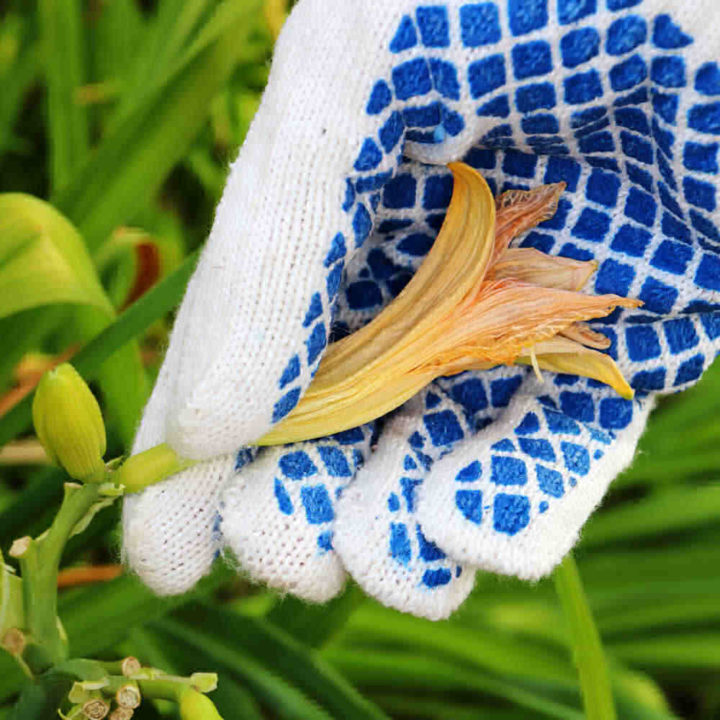
Deadheading daylily blooms is very easy. Once the flowers have blossomed and started to fade, the entire scape can be removed using a sharp pair of garden shears.
My daylilies are several years old, so the number of blooms on each scape is numerous. To keep the plant healthy looking and tidy, I wander around the garden, with a bucket and simply grasp the old flower bud with my thumb and forefinger, just behind the flower base where it attaches to the scape.
Then I snap off the spent bloom with my hand and drop it in the bucket. This leaves the remaining buds intact and ready to open on another day.

The spent flowers can then be discarded with your garden refuse or added to your compost pile. Easy, peasy, and the plant is tidy in less than a minute.
Once I get down to one or two blooms on a stalk, I use my shears to cut the entire stem. down to the base, and bring the bloom indoors to add to a vase of cut flowers.

This process keeps the plant tidy, prunes the entire stalk away and gives me flowers for inside. And it takes very little time!
I keep my tools in a repurposed mailbox so they are handy when I need them!
A note on deadheading daylilies
It takes a bit of practice to get good at deadheading daylilies. If you are not careful, or try to deadhead the spent bloom too soon, you can easily damage the scape or dislodge neighboring buds which have not opened.
You might decide to wait and remove older, dry, and withered blooms instead of the fresher ones. These seem to almost fall away by themselves. However, the ovary is still left behind, attached to the flower stem.
This ovary must be removed by snapping, pinching, or cutting with shears to prevent seed production and encourage new bud growth.

Deadheading daylilies – When is it time?
I take time every few days deadheading daylilies, but if time is limited for you, there are three specific times when deadheading is in order:
- When you would like to promote better bloom and a tidier plant, remove the scapes of plants that have no more buds ready to bloom to tidy up the plant and promote future bloom.
- When the plant forms seed pods, deadhead before the seed pod cracks open at the top, which is an indication that it’s forming seeds.
- In late fall or early spring, daylilies are seasonal. Once the bloom cycle is complete, this is the perfect time to deadhead.

Is Stella D’Oro the only re-blooming daylily that needs deadheading?
I’ve mentioned Stella D’Oro as a daylily that should be deadheaded since it re-blooms.
Stella D-Oro is certainly the most often seen daylily and the most common re-flowering variety, but it is not the only one which will re-bloom. (affiliate link) Some others to look for are:
- Eenie Weenie – deep yellow color
- Plum Happy – rose-pink and purple
- Raspberry Eclipse – hot pink and yellow with ruffled edges
- Peggy Jeffcoat – yellow and white flowers
- Happy Returns – lemon yellow flowers
- When my Sweetheart Returns – rose and lemon colored
- Moses Fire – Ruffled, double type in a rich red color
How to prune daylilies after they bloom
It is not just the flowers of daylilies that get untidy. The whole plant starts to die back after flowering, producing unkempt yellow leaves.
It might be tempting to spend some time pruning daylilies after they bloom by cutting away the yellowing leaves. After all, this will make the garden neater, right?
Not so, it seems. Daylily leaves are responsible for photosynthesis and the absorption of carbon dioxide, its primary source of carbon. This energy helps to build up the root of the plant, which makes it healthier and more productive of flowers in the future.
This is the case with most bulb-like plants.
If you trim off the foliage of daylilies, you will find that the plant gives a much poorer show of flowers next summer.
The daylily “Classic Edge” shown below is almost finished flowering. But it is still summer. The finished brown scapes can be trimmed away, but the decaying foliage should be left till later.

Pruning daylilies for winter
It is not necessary to cut daylilies back in the fall, but it does have advantages. Doing so keeps the garden neat and tidy all winter long. Also, since there will be no decaying foliage, the plant won’t have a chance to harbor diseases and pests.
To remove the yellowed foliage in late fall, cut the old leaves back to a few inches from the ground. I like to leave any green foliage.
Cutting back daylilies in spring
If you prefer a spring garden clean-up instead, you can wait to remove those leaves, in the same way. Do this as soon as you see new growth emerging in spring.
Scapes that have finished all the flowers can safely be cut back to the base at any time to keep the plant tidier.
Dividing daylilies that have stopped blooming
Daylilies will spread quickly into large clumps. Eventually, the plant will become so crowded that it will not bloom well. When this happens, divide the daylily patch during the growing season.

If you plan to divide the plant, it’s a good idea to divide daylilies right after they have finished flowering. This gives the new plants time to form the root area during the winter.
Pin this post for deadheading daylilies
Would you like a reminder of this post on how to deadhead a daylily? Just pin this image to one of your gardening boards on Pinterest so that you can easily find it later.

Admin note: This post for deadheading daylilies first appeared on the blog in June of 2013. I have updated the post to add all new photos, a printable project card, more daylily information, and a video for you to enjoy.
Deadheading Daylilies - How to Clean Daylilies After They Bloom.
Deadheading daylilies helps to keep the plant tidy and also sends energy to flower rather than seed formation.
Fortunately, it's very easy to do.
Materials
- Daylily
- Bucket
Tools
- Garden shears
Instructions
- Bring a bucket and your shears to the daylily patch.
- Grab the spent daylily blossom with your thumb and forefinger and snap it off at the base, being sure to get the swollen part of the blossom with contains the ovary of the bloom.
- Drop the spent blooms in the bucket.
- Each daylily flower lasts just one day. It's not necessary to deadhead every day. Deadheading a few times in a season is sufficient.
- When all of the blooms on the daylily stem have finished, use the garden shears to cut the stem off near the base.
- Be sure to deadhead the stem if you see a seed pod develop.
- Discard the spent blooms with garden yard waste or in your compost pile.
- Leave the yellowing leaves until late fall to help develop the root area of the plant.
Recommended Products
As an Amazon Associate and member of other affiliate programs, I earn from qualifying purchases.
-
 Little Grapette Daylily Bare Root - Perennial Daylily, Long Lasting Blooms, | Outdoor Gardening Daylily Flower Plants (2 Pack)
 -
 Easy to Grow Daylily 'Strawberry Candy' Plant Divisions (3 Pack) - Beautiful Pink Flowering Blooms in Spring to Summer Gardens
 -
 Set 6 Orange Daylily Live Starter Plant, 4-6" Tall, Daylilies Plant, Hardy Flowering Plant for Yard, Garden and Landscaping, Bareroot
Darlene
Wednesday 25th of June 2025
I had day lilies in 2 areas. The deer has eaten every one of the blooms off as well as my hosta . What can l put on them next year to keep the deer away. Thank you from North Carolina.
Carol Speake
Saturday 28th of June 2025
Hi Darlene. One thing that may help is to plant things that deer don't like near your daylilies and hostas, to try and repel them. Plants with strong aromas such as lavender,catmint, garlic, and chives are some suggestions. Other deer-resistant plants are foxglove, bee balm, salvia, and yarrow.
Other than this, fencing is what is suggested to keep deer away but this is not always practical. Carol
Anne lapoint
Wednesday 11th of May 2022
Was wondering if you have a book on day lilies and if you sell them. Thank you
Carol Speake
Wednesday 11th of May 2022
No I don't have a book on them or sell them, but there are several articles on my site about them.
Brenda Rosario
Tuesday 5th of April 2022
Please tell me what to do with the seed pods of daylily. When to plant them . Can I just leave them on the plant? Thank you
Carol Speake
Tuesday 5th of April 2022
Cut off the seed pods and break them open over a container. The seeds are more likely to germinate if sown immediately after gathering. They can be stored until spring if kept in the refrigerator but their germination rate will be less.
Carol Bullock
Saturday 29th of June 2013
Love love love your frilly centred pink holly hocks, I,ve been looking for some double ones for years with no luck. Do you save your seeds?
admin
Saturday 29th of June 2013
I have only grown them for two years and they seem to self seed, so I have not saved any seeds.
Carol
Joyce
Thursday 20th of June 2013
Thank you for sharing. We are redoing a friends yard and she is looking for some beautiful plants that flower. Several I have recommended but it will give her a visual. Thanks again. Great job, they are gorgeous.
admin
Saturday 29th of June 2013
Thanks Joyce!