
How are your fudge-making skills? Do you end up with foolproof fudge that forms nice little parcels, or do you find it a challenge? These cooking tips for making perfect fudge,F will give you wonderful results every time from now on.

It’s hard to believe, after a summer of gardening, that the beginning of the holiday season is already upon us. When I think of the holidays, making a perfect fudge recipe comes to my mind.
As an Amazon Associate, I earn from qualifying purchases. Some of the links below are affiliate links. I earn a small commission, at no extra cost to you, if you purchase through one of those links.
Tips for making foolproof perfect every time.
One of my favorite things to do this time of the year is to make fudge. I think I have tried just about every combination imaginable.
Sometimes, my fudge recipe comes out perfectly with very little effort, and other times I am literally pulling my hair out in frustration for even attempting this batch.
Does this sound like you? Never fear – just read on for lots of tips for your next fudge-making endeavor.
Fudge is one of those must-have recipes this time of the year and everyone has a favorite or two.
One of my favorites is a lovely mosaic fudge that I make each year for my Christmas table. It is very colorful and looks “Christmasy” with the addition of the red and green cherries. The list of ingredients in this delicious fudge recipe includes white chocolate chips and condensed milk. This makes it foolproof without much effort on my part.
However, each fudge recipe varies, not only in the ingredients but also in the technique involved.
So what is a cook to do? One size does not fit all in the fudge-making department! There are a few tricks to keep in mind when making a batch of fudge.
These fudge making tips will help to ensure that you end up with foolproof fudge.
The holidays are the time to try out some new fudge recipes. Do you have a problem getting fudge to set correctly? Head to the Gardening Cook to learn my tips for foolproof fudge. Share on XCooking tools for foolproof fudge.
Let’s start with the tools you will need for making perfect fudge. Pretty much every fudge recipe needs these items to have it come out correctly.
Use a heavy saucepan with tall sides for perfect fudge without the mess.
Many fudge recipes need to be boiled for quite a few minutes to set well. If you choose a pan that is too small, you will ensure a “boil over” which makes a huge mess on your stovetop.
Choose a pan that is at least three times the volume of your ingredients to avoid this.
I use a tall sided stainless steel pot. A large saucepan with a long handle is also a good choice.
Try to choose one that has a heavy bottom and is made of stainless steel, but other types work well too, as long as the size is right and the sides are tall.
A pot I recommend for making foolproof fudge is a Calphalon Tri-Ply stainless steel 4 1/2 quart saucepan.
Choose wooden or silicone spoons and spatulas.
I used to use a wooden spoon all the time when making fudge. However, with the advent of silicone kitchen tools that withstand very high heat, I find that I use these more and more to make my fudge.
Whichever type you use, be sure that they are very sturdy. Some fudge recipes can get very thick in no time at all and a flimsy spatula just won’t do the trick.
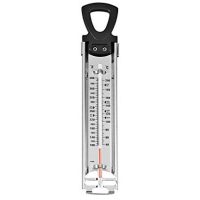
A candy thermometer tests your fudge temperature.
Making perfect fudge really boils down to one thing – getting the fudge mixture to the right temperature.
There are various ways to do this, but using a candy thermometer will make sure that you are not just guessing.
If you under-cook the mixture, you will end up with fudge that does not set, no matter how hopeful you are or how long you keep it in the fridge.
On the other hand, over-cooking the fudge will make it very hard, grainy, and crumbly. A candy thermometer will ensure that you cook to exactly the temperature that your recipe calls for.
Not all candy thermometers are rated equally. Some imported glass models are downright dangerous! Be sure to read the reviews on a candy thermometer before you purchase one.
Testing fudge without a candy thermometer.
If you don’t have a candy thermometer, you can still test the fudge temperature doing what my mother used to call the “soft ball” stage.
She kept a clear glass of water near the cooking pot and would drop bits of the mixture into it as she was cooking.
When the mixture formed a small soft ball by rubbing it between her fingers, she knew she had cooked it enough.
Scientifically speaking, when sugar syrup is dropped into cold water between 237 to 239 °F it will form a soft, flexible ball. When you remove the ball from the water, it will flatten like a pancake in your fingers.
Since fudge is often made by cooking ingredients to the soft-ball stage, seasoned cooks use this method. The technique requires practice and precision but is a good tool to have experience with if you make fudge often.
However, even this method requires some guessing, as I often found out. When in doubt, use a candy thermometer!
Line your pan to release the fudge easily.
Once your fudge has been made and has set, you will want to be able to remove it easily from the pan. You can grease the pan, and this works okay, but one trick that I have found that works well is to line your pan with foil.
I use a 9 x 9 glass pan with two wide sides. Then I extend the foil up the sides so that I have “handles” to remove it when the fudge has set. The foil is then sprayed with Pam or another cooking spray.
Use the foil handles to pull the fudge out of the pan and then just peel it away from the fudge mixture. Easy, peasy!
Another way to do this it to line the pan with a silicone baking mat. This gives a super easy release that won’t leave any residue to peel off, the way aluminum foil some times does.
The downside to silicone mats, however, is that they do not produce fudge edges that are as neat as aluminum foil.
See this post to learn about other uses for silicone baking mats. They may surprise you!

More foolproof fudge-making tips.
You can have all the tools in the world on hand, but without some tried and true techniques, your attempt at making foolproof fudge might not be successful. These tips for making perfect fudge should help.
Best ingredients for making perfect fudge.
If you are new to cooking fudge, look for recipes that contain marshmallow cream, marshmallows or corn syrup.
Using these items in your ingredients will help to make sure the fudge does not crystallize into large particles. This ensures that it will set well, which is one of the main fudge problems for beginners.
The soft marshmallows in this rocky road fudge, complement the creamy nature of the chocolate for a great-tasting fudge.
Also be sure to use good quality pure vanilla extract(not the cheaper imitation flavor) and full cream butter. These ingredients make a huge difference in the taste of the finished fudge recipe.
Don’t substitute margarine for butter, since it contains more water and the fudge won’t set as well.
Which is best for making perfect fudge – milk or cream?
Regular milk has a tendency to curdle at high heat. Try to find recipes that call for evaporated milk or cream instead. Cream also gives a smooth texture to your fudge that milk just won’t deliver.
Many fudge recipes that are labeled “no-fail fudge” call for sweetened condensed milk. If you want a fudge that is sure to set, try a recipe with this ingredient in it.
Gather your ingredients before you begin making the fudge.
This is a good rule of thumb for any recipe, but for fudge, which can sometimes set quickly, it is extra important. Doing this will also make sure that you have everything you need to actually make the fudge. 
Nothing is worse than getting to the end of the recipe and finding out that you don’t have the nuts, or chocolate chips that you were SURE were in the pantry. (Don’t ask me how I know this!)
Don’t scrape the cooking pan after the boiling is reached.
A question that I am often asked is “Do you stir fudge while boiling it? The answer is yes and no.
Sugar has a tendency to crystallize when cooked to a high temperature. This happens whether you make fudge in the microwave or on the stovetop.
Stirring is part of the procedure in either case while the mixture is brought to a boil, but only until this point.
If you continue stirring through the rest of the cooking process, you will cause crystallization and the fudge will become grainy.

Remember, if you scrape the edges of the cooking pan when you remove the fudge, it may allow sugar crystals to mix with the fudge ingredients.
A way to avoid the issue of crystallization is to coat the sides of your pan with a brush dipped in water before you start the cooking process.
By all means, scrape the pan to “taste test” after you get the fudge in the pan! That is part of the fun of fudge-making!
Avoid making fudge on a humid or rainy day.
Surprisingly, humidity can affect fudge making. On humid days, the candy mixture can start reabsorbing moisture from the air.
This will make your fudge softer than you would like it to be. It’s recommended that you make fudge on dry days when the humidity is low.
Cool weather is also recommended for making perfect fudge, which is why so many fudge recipes are made in the colder months.
The fudge sets more quickly and has less chance to form unwanted crystals which make it grainy.
Test your candy thermometer to ensure perfect fudge.
Many cheap cooking thermometers are notoriously inaccurate. Be sure to test yours before you begin for best results.
To test a thermometer, bring water to the boiling point and insert the thermometer into the water, being sure not to let it touch the bottom of the pan. Let the temperature rise until the water boils. It should stop at 212º F.
Trying to make something like caramel style fudge requires a very good quality candy thermometer for best results. 
Cool first, then beat the fudge.
Once you have made sure to cook the fudge to the desired temperature, remove it, allow it to cool, undisturbed, to 110ºF, and then beat it vigorously.
A slight skin should form on the top of the fudge. It can take a while to reach this stage.
Do this before adding other ingredients such as nuts and dried fruit.
One trick my mother taught me is to place water in the sink and then set the pan of fudge into the water while you beat it.
Many professional fudge makers pour the fudge mixture onto a marble slab to get it to cool. The marble allows the fudge to cool evenly and quickly.
Once cool, beat the fudge until it begins to thicken and has lost its glossiness.
Just as not stirring was important during the cooking stage, beating now is very important. Stirring controls the size of the sugar crystals that form and this keeps the fudge from getting grainy.
Take care when adding other ingredients to fudge.
It’s fine to experiment and add other ingredients to your fudge mixture, but be careful to pay attention to their water content.
If the ingredients have a high amount of water in them, this will affect the consistency, and the fudge may not set well. 
Some safe ingredients to add to fudge are:
- nuts
- marshmallows
- raisins
- other dried fruit
- peanut butter
- M&Ms
- chunks of your favorite candy bars.
Be sure that the ingredients go well together like the peanut butter and chocolate in this buckeye fudge.
Another thing to keep in mind when you are adding nuts or fruit to your fudge is their temperature. It is advised to warm them slightly in a microwave before adding them.
If you add them to the fudge mixture when they are too cold, the temperature difference may “shock” the fudge and make it turn solid too quickly.
Foolproof fudge needs a resting time before cooling.
Sure, we all want a piece of that homemade fudge NOW…but cooling it too quickly can cause crystallization and a grainy fudge.
Allow the finished fudge to cool at room temperature for a while to set. The cooling time depends on the ingredients used, so use the instructions in your recipe for guidance.
I don’t recommend putting fudge in the fridge or freezer to get it to set.
Use a sharp knife to cut fudge.
Be sure the fudge has been completely set before you try to cut it to give you those perfectly shaped edges. Clean the knife from time to time between cuts, as well.
This pistachio nut fudge has a professional look to it, in great part by the perfectly straight edges.
It is also a good idea to “score” the fudge with a sharp knife while it is still warm. This will make cutting it into even squares easier, later, when the fudge has set.
Storing fudge properly.
If you go to the trouble to make perfect fudge, you will want to store it properly. To keep homemade fudge at its best, cover it tightly with waxed paper, foil, or clear plastic wrap.
Once wrapped, store it in an airtight container in a cool, dry place.
If the recipe specifies that you store it in the fridge, be sure to keep it there.
Fudge can also be frozen for later use. Some fudge has a tendency to be sticky. If you store it in layers, add wax paper or parchment paper between the layers.
Check out this post to learn more uses for parchment paper.
Putting the fudge in individual baggies inside of gift boxes is helpful for protecting homemade fudge that will be given as gifts. An added bonus is that the fudge will retain its freshness better.
Problems with fudge consistency answered
In spite of the right tools and techniques, achieving a foolproof fudge can still be a challenge. Fudge problems can range from too soft, to gritty, grainy, or too sticky.
Ideally, you want a firm consistency that hardens well, cuts well, and is not too sticky. (like this peanut butter swirl fudge.) Here are some tips for getting those results and fixing problems.
Temperature for perfectly cooked fudge.
Most fudge needs to be cooked to a temperature between 237 and 239º F. This evaporates part of the liquid and makes sure that the fudge is neither too hard nor too soft.
How to fix undercooked fudge.
This has been my most common problem with fudge. It happens when I DON’T use a thermometer. Guessing just does not work, (for me at least) with fudge.
If you only allow the fudge to cook to about 110º F or so, the sugar will not be concentrated enough.
If you end up with fudge that is too soft, you can make truffles out of the mixture and roll them in coatings.
If you want to save the fudge, return it to the pan, add about 2 tablespoons of cream and bring it to a boil. Let it boil until the temperature reaches 237 and 239º F.
Why is my fudge overcooked?
This means that the fudge will have reached too high a temperature. There will not be enough liquid left to form sugar crystals.
The result will be more of a peanut brittle type of consistency – very hard and brittle.
To save a fudge recipe where this happens, add about 4 tablespoons of cream and bring the mixture to a boil. Then let it boil to the desired 237 and 239º F.
Fixing grainy fudge.
Grainy fudge is caused by one of three problems: overcooking, over beating or neglecting to cool it properly.
To fix grainy fudge, add 1 1/2 cups of water to the fudge mixture and cook gently until the fudge dissolves again.
Then start the entire cooking process over, being more careful about the heat, beating and cooling steps.
Fool-proof perfect fudge tip.
There are a few fudge recipes out there that don’t depend on a high cooking time for them to set. Some of the popular ones use confectioner’s sugar instead of brown sugar or granulated sugar.
Often, these recipes do not require long cooking on the stove. These fudge recipes are almost always foolproof. They are also very, very sweet.

Avoiding ingredient problems when making fudge fudge.
Sometimes, your ingredients will let you down. Have you ever started a brown sugar fudge recipe only to discover that your brown sugar has hardened?
No problem! These 6 easy tips for softening brown sugar are sure to help.
What can I do if my fudge is too stiff?
When your finished fudge is too stiff, kneading it in your hands will soften in slightly. Then, you can press it into a pan or roll it into a long log and slice it.
While it won’t have the traditional fudge shaped squares, it will still taste good.
How to know when fudge is ready.
The fudge is ready to remove from the heat when a candy thermometer reads between 237 and 239 °F. If you don’t have one, cook to the “soft ball” stage.
How long does it take for fudge to set?
Once the fudge has been cooked, has thickened and any extra ingredients added, it will normally set in about 3 hours. You can also make it in the evening and allow it to set overnight.
Does fudge set in the fridge?
As tempting as it might be to rush your fudge making project by putting it in the fridge to harden more quickly, resist this urge.
Cooling fudge too rapidly can cause sugar crystallization to occur too soon. This causes a grainy fudge.
Placing fudge in the fridge while it is still soft also allows it to pick up other flavors from the fridge and causes it to dry out more quickly.
Cool fudge and store fudge properly as described above for better results.
My favorite foolproof fudge recipe.
See this foolproof Reese’s peanut butter cup fudge as an example of foolproof fudge.
The fudge is made in the microwave and comes out perfectly every time.It really is foolproof even if all your fudge recipes fail!
Have I missed some of your tips for perfect fudge? Please leave them in the comments below.
Pin these tips for making perfect fudge.
Would you like a reminder of these tips for foolproof fudge? Just pin this image to one of your dessert boards on Pinterest so that you can easily find it later.

A collection of perfect fudge recipes.
Now that you know how to make foolproof fudge, it’s time to try some new recipes. But be careful. Once your family tastes these, you will be their go-to person for fudge making!
Bailey’s Irish Cream and Coffee Fudge
5 Minute Peppermint Chocolate Fudge
Snowflake and Christmas Wreath Fudge
Easy Chocolate Raspberry Fudge
Admin note: This post first appeared on the blog in December of 2015. I have updated the post with new recipes and tips, a printable card and a video for you to enjoy.
Tips for Making Perfect Fudge Every Time

Making great fudge is not a matter of chance. There are several things you can do to ensure great results each time.
Materials
- Wooden spoons and spatulas
- Tall pans
- Aluminum foil
- Sharp knife
- Fresh ingredients
Tools
- Candy thermometer
Instructions
- Use a heavy tall sided saucepan to minimize spills.
- Wooden spoons and spatulas give best results.
- Invest in a candy thermometer.
- Line your pans with foil for easy release later.
- Be careful with ingredients. Use freshest available.
- Cream is better than milk.
- Butter is better than margarine.
- Don't scrape the sides of the pan while cooking.
- Test your candy thermometer.
- Use a very sharp knife for cutting.
- Avoid making fudge on rainy days.
- Allow fudge to come to room temperature before putting in fridge.
Recommended Products
As an Amazon Associate and member of other affiliate programs, I earn from qualifying purchases.
-
 Wilton Candy Thermometer - Candy Making Supplies
 -
 Secura Duxtop Whole-Clad Tri-Ply Stainless Steel Induction Ready Premium Cookware with Lid, 1.6-Quart
 -
 M KITCHEN WORLD Heat Resistant Silicone Spatulas Set | Rubber Spatula Kitchen Utensils Non-Stick for Cooking, Baking and Mixing | Ergonomic, Dishwasher Safe Bakeware Set of 4, Orange
Sue Darwell
Sunday 27th of June 2021
Thank you for all your tips and help with fudge. I did everything right but my fudge took too long to reach the right temperature and start to burn before 110 deg C. I wasn't sure what to do as it needed to cook longer! I didn't have the temperature high for cooking maybe the pot needs to have a heavier base?
Michelle M Bivens
Wednesday 21st of December 2022
@Sue Darwell, I always had that problem also. I found a small pressure cooker at a yard sale for a dollar. It didn't have the pressure rocker but I bought it anyhow thinking I would buy one I used it to make fudge in and didn't have that problem. That's my go-to pan for candy now.
Brigitte Jones
Tuesday 17th of August 2021
I have exactly the same problem. Fudge always burns before correct temp is reached.
Angie
Friday 11th of December 2020
Thank you for the excellent tips in this article. I do have a question. You say to use "cream". Do you mean half and half coffee cream, or heavy cream like you would use to make whip cream? Cream has become a generic term, so not sure which I should be using. Thank you.
Carol Speake
Friday 11th of December 2020
Hi Angie, The tip on using cream is a general tip meaning heavy cream. By saying this, I mean that cream instead of milk gives a creamier fudge. However, if you are following a recipe which asks for half and half, or specifically asks for milk, you should inquire from the recipe creator. Substitutes don't always work.
Tami
Monday 30th of December 2019
Thank you for these wonderful tips. I still have a question though. I have made my penuche fudge for years. We recently moved to a higher altitude and dryer climate. My fudge keeps turning out dry/ crumbly. Any suggestions?
Carol Speake
Tuesday 31st of December 2019
I don't like in a higher altitude but my understanding is to adjust the temperature to a higher altitude, deduct two degrees from the temperature required for every one thousand feet of altitude above sea level. For example, if you live 5,000 feet above sea level, you would deduct 10 degrees from 230 degrees (or whatever your recipe calls for.)
Tips for Making Perfect Fudge Every Time - Lil Moo Creations
Thursday 3rd of December 2015
[…] Tips for Making Perfect Fudge Every Time […]