
This year, we spent the summer on a garden make over. I thought it would be fun to share the tips that I learned during the process.
It’s that time again. Time to transform one of my garden beds that just won’t seem to keep to a single design.
I call it my “what will it look like this year” garden bed. For some reason, this particular garden bed never seems to be just what I want it to be, so I do it over again the next year! 
Get A Successful Garden Make Over With 14 Easy Tips
This one area of my back yard has been made over three years in a row. It started as a 500 sq. foot piece of grass and weeds.
I used the lasagne garden bed technique that transformed the piece of land into a vegetable garden. That worked out okay, but then I got ambitious.
The next year, I enlarged it into a 1000 sq. ft. vegetable garden. The squirrels ate almost everything planted in it and it was one of my most frustrating years of gardening.
The third year, I transformed it into a perennial and vegetable garden. The perennials grew well but the vegetables were a disappointment and it was just way too large for me to manage as a flower garden.
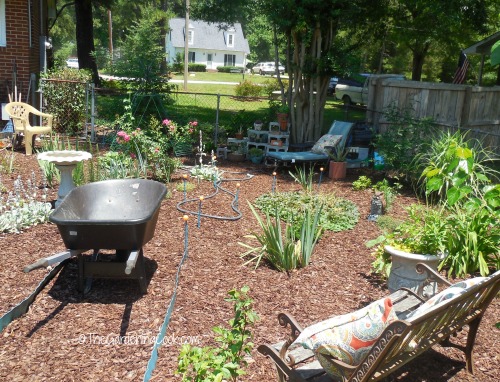
This photo shows how the garden space kept changing. This year, my husband has convinced me that 1000 sq. ft. garden bed really is more than I can handle. (bear in mind I have 10 other large garden beds!)
I relented and cut it back by about one third. I spent most of the early spring doing the paths, and weeding to get it to somewhat of a presentable look.
I like, it but I don’t LOVE it. It is still missing that special something that makes me stop and admire it every time I gaze that way.
Time for the Transformation
If your garden beds always seem to be in a state of change, perhaps it is time to slow down and do some real planning.
There is no reason to be satisfied with a boring garden that doesn’t wow you every time you look at it.
With the help of my 14 easy tips, perhaps you, (and I) will be able to transform our garden design into one we love every time we look at it. (and have it last for more than one season!)
I had a few elements that I wanted to work in to my garden bed and knew that I wanted a South west design for the foal point and wanted to tie that into other design elements.
I did a quick search on Google images for “Southwest Garden Design” to give me some inspiration and this is what I found: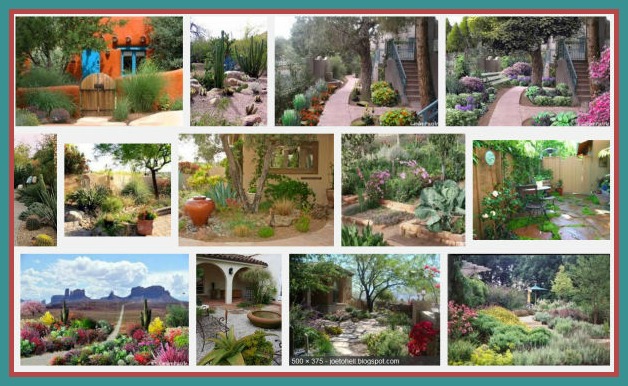 This gave me some needed inspiration and an idea about colors, but also a problem.
I know that I will never have a total Southwest design, because I live in the South East of the US, not the South West, but I found that I could incorporate several aspects of my desired theme successfully:
- Seating areas
- Potted plant sections
- Colors
- Succulents and cacti for part of the garden
- Rustic paths and garden accents.
14 tips for a successful garden make over
If you want your garden make over to be a success, there are several things that you should keep in mind.
1. Function
Decide what it is that you want out of your garden. Do you want it as a retreat, or want it to be a working garden?
Has it served a purpose once (like my vegetable garden did for me) but now all you want to do it sit and admire it?
This is perhaps the most important step. Really think about it and decide just what you want your garden to be.
For me, I wanted a retreat area that was fairly low maintenance with seating areas and a place for my succulent and cactus collection.

2. Reshaping works wonders
One of the biggest problems for me is that even though my garden did have a shape, it was so large that, from my deck area, it always looked like one big square.
Cutting down the edges and reshaping the borders did wonders for it.
When I look at my garden bed now, I can see some definition to it. Curving the pathway down the center added some softness too, which was sorely needed.

3. Be realistic
Think about the time that you have to spare to take care of the garden. It is not realistic to think that you can manage a full out vegetable garden if you only have limited time to water it.
Also, your time will vary from year to year, so what you can manage for gardening will change too.
Give this some thought before you start digging. It is easy to be “optimistic” at this stage and regret it later.

4. Choose a central design
The best garden designs are ones that flow around a central theme.
For this garden bed, I have a main focal seating area that will have a Southwest design, so I want to carry this through to other areas of the garden bed too.
I’ll incorporate colors that match in both plants and other accent pieces throughout the bed for a cohesive look.
Since turquoise jewelry and rust colored terra cotta pots are so prevalent in the Southwest, these were the two main colors that I chose.
 5. Consider maintenance
Will you need to get a wheelbarrow into the bed? Then paths are needed.
Will you be potting often for it? How about a near by potting table and some pots and supplies.
Does the garden have trees and shrubs? You’ll need pruning tools nearby.
The best planned garden bed won’t look so great if it is ignored and never maintained, so be sure that the things you will need to do to take care of it are easy to access.
6. Accent pieces
A nice seating area, birdbath, colorful planters, humming bird feeder or other accent pieces not only add pops of color but also functionality to a garden bed.
Add a few accent pieces that go with your design to give it some extra appeal.
I was able to add a birdbath, a hummingbird feeder (near my red vols daylily and red hot pokers!), some colorful DIY hose guides, a park bench, lots of planters, a garden supply bookcase, and a DIY cement block plant pot holder to my design.
Many of these were items that I already had on hand and weren’t being used or were made from recycled materials.
7. Watering
Perennials are the least demanding plants to care for, but even they need some watering.
If you will have planters, annuals or vegetables, you will need to make sure that you have an easy watering set up near by. I have my hodr snaked into the garden bed following some hose guides.
My watering nozzles and cleaning nozzles are attached and stored near by in a plastic container in my potting bench.
The watering nozzle is attached to my hose, but the cleaning nozzle is right at hand when I need to clean out the bird bath.
It makes it easy to keep on top of both watering and cleaning without having to go and find the tools when I need them.

8. Choice of plants
This choice will be dependent on your planting zone and also your time available for caring.
I start with perennials and bulbs, suited to zone 7b, as my main planting choices and then add some additional flair with planters and pots for some additional plants.
In the case of my garden bed, these are cacti and succulents in pots, which will do well during the summer, need little water in our heat and will tie in the Southwest theme well.
I have also have a clump of day lilies that bring in the rust color of my cushions.
A large astilbe ties in the cream background and adds some softness is growing in a shady area of the garden bed. A big clump of lamb’s ear adds the perfect soft touch in a perennial plant and looks great near the birdbath.
 9. Change the color scheme
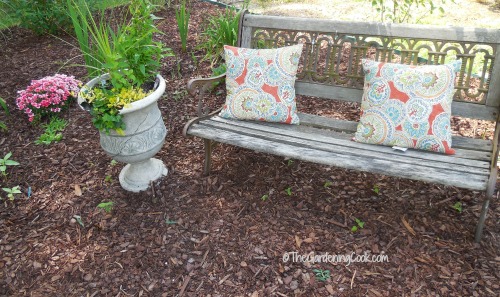
The easiest way to make over a garden is simply to change the accent pieces in a seating area. In my garden bed, I had a worn out lounge chair cushion that had seen it’s better days.
Adding the turquoise chair cover and cushions with pops of color, gave me the idea for the South west design with just a change out, and it made it easy for me to work to the finished look.
All that was needed now was to add planters and succulents near it to make this the focal point of my garden bed.
 10. Organize your planters
Plants in pots, here and there, in a garden bed can look “bitty” and disorganized. Arranging them into one focal area adds a great deal of interest to that spot and helps to tie the theme of the garden bed together.
I recycled a pile of messy old cement blocks into this DIY Cement Block Plant Shelving unit and love the way it adds to my theme.

11. Recycle and Reuse
A well planned and executed garden bed does not have to be expensive. Most of the plants in this garden bed came from divisions or cuttings from my other garden beds (the same went for many of the planters too.
The planter stands were made from old cement blocks that had been sitting in my back yard for a year. These I turned it a great succulent plant staging area.
The DIY hose guides were old pieces of re-bar that I painted, and some Dollar store plastic golf balls.
One heart shaped planter holder was a flea market purchase that I gave a new lease of life to.
And my potting bench was an old shabby chic book case that I re-vamped with my new colors. What do you have that could be reused in your garden bed to get a new lease of life?

12. Incorporate Trees and Shrubs
Don’t forget to add a few trees or shrubs. They add height and dimension to a planted bed and will give shade to seating areas.
My two seating areas each have trees nearby. The crape myrtle sits over the main seating area, and the nearby park bench area has two small trees that will also give shade there in a few years.
This magnificent Crepe Myrtle got a hair cut last year after flowering and has not yet started to bloom this year, but it will fill out and give shade and color to my new seating area.

13. Get whimsical
When my husband walked into the house with a box of old, worn out musical instruments, I thought he might have gone a bit nuts until he explained his reasoning.
I was a music major in college and he thought that my new garden bed might be able to incorporate them into some whimsical garden planters.
There are so many junk items that can be made into garden planters. Just think outside the box! I had one area of the garden bed not planted that is overlooked by the park bench.
What better use for the instruments than a “sounds of the Southwest” section? Now I just need to find an old drum to add to it to round it out!

14. Hide eyesores
No matter how gorgeous your garden area is, if there are eyesores around it, they will detract.
Use larger plants to cover areas that you don’t want seen. In my case, the two eye sores are the crawl space for our house and the chain link fence to the right of the garden bed.
I used elephant ears to hide the crawl space and butterfly bushes and silver grass to diminish the garden fence (and hide a lot of my neighbor’s yard.)

By following these easy tips, I was able to transform a plain, and much too large, garden bed into a magnificent retreat.,
It now has two seating areas, a place for birds to take a bath and feed in a hummingbird feeder and a place to house my collection of succulents and cacti.
While not totally Southwest from start to finish, it does have elements of this type of design and both accent pieces and colors add to the overall look.
I can’t wait to start using it as my place to sit and dream!
Here are some more photos showing the garden bed after the make over. I hope that it will give you some inspiration for your garden make over project.

This heart shaped planter was a flea market find that was rusty and horrible looking.
Spray paint on the planter and some discarded pots gave it a new lease of life! 
Red hot pokers and Red Vols Day lilies are the perfect plants to attract hummingbirds to my feeder.

This side view of the garden bed is awash with color right now. What a lovely part of the garden to admire from the seating area with my lounge chair.
 This pretty garden supply bookcase started out as a really dilapidated old book case.
This is a view from the front of the new bed. 
And this is the view from the side. Quite a change from the first year before picture, don’t you think? Are you planning a garden make over project for the summer? I’d love to hear about your plans in the comments below.
Ruth Cooper
Wednesday 20th of May 2020
Thanks so much for sharing and becoming part of my inspirational experience. I am overwhelmed and found your ideas grounding ... expecially the ideas pertaining to theme and focal points :) Ruth from Hamilton Ontario Canada