
These scrap wood pumpkins are a great way to dress up your front steps for Halloween and fall.
This pumpkin DIY project is made from an old mailbox post that was left over when I gave our front mailbox a makeover this summer.
Making home decor projects using items that have been recycled is both cost-efficient and eco-friendly.
Keep reading to learn how to make this fun fall pumpkin decor project.

Reclaiming the wood
Using reclaimed wood makes this project a thrifty one. This old mailbox post had definitely seen better days, hasn’t it? Who would have thought that it was a bunch of pumpkins just wanting to be reborn?
Supplies for the scrap wood pumpkins
To make this DIY project, you will need the following supplies:
- 3 pieces of 4 x 4-inch reclaimed wood. (4-inch, 6-inch, and 8-inch pieces)
- 3 small garden twigs
- A piece of moss
- Natural raffia
- Acrylic paint
- Brown pipe cleaner
- Small paintbrush
- Black paint pen
- Autumn floral picks
- Hot glue gun and glue sticks
Optional: Filler and sandpaper (If your wood is in bad condition).
Making the scrap wood pumpkins
If your reclaimed wood is in bad shape, use sandpaper and filler to make it smoother.
Paint the reclaimed wood with orange acrylic paint and let it dry.
When the paint is dry, use a paint pen to outline the faces on the orange pieces of wood.  You can paint an outline of the faces freehand by looking at the pattern below, but if you are not comfortable doing that, you can use the free printable below and some transfer paper to transfer the outline of the faces to your wood for painting.
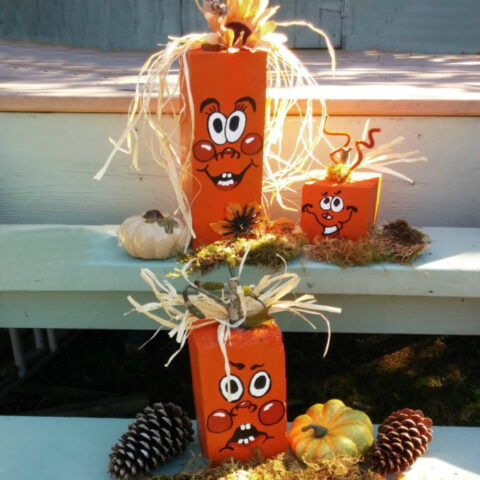
The three faces are quite different – one girly, one funky, and one a bit puzzled. Get some twigs from your garden to use as pumpkin stems.
Paint the stems and let them dry. Attach them to the top of the orange painted blocks with hot glue.

Decorating the pumpkins
Use the floral picks, moss, and brown pipecleaner to decorate the stems:
- Moss and a brown pipecleaner on one stem
- Pussy willows on the second stem
- A large sunflower on the third stem.
Attach these pieces to the three stems with hot glue.
Making hair for the pumpkins
Add a few pieces of natural raffia to make hair. One block gets a crew cut, the girly girl pumpkin gets long hair, and the funky guy gets a funky haircut!
Use the black paint pen to outline the designs on the faces and paint them with black, orange, and white colors.
 That’s all there is the this project! Aren’t they cute? (although the girly girl needs a bit of eyebrow waxing, but what are you gonna do when the paint is dry?)
Share this project for scrap wood pumpkins on X
If you enjoyed this tutorial for making recycled wood pumpkins, be sure to share the project with a friend. Here is a tweet to get you started:
Recycled wood, some craft supplies, and some paint turn pieces of scrap wood into pumpkins for this fun fall decorating project. Find out how to make these fun wood pumpkins on The Gardening Cook. Share on XStaging the scrap wood pumpkins
Use some pine cones, some faux pumpkins, and a bit of moss, plus a couple of black plastic spiders, to decorate around the reclaimed wood pumpkins. You can remove the spiders as the time gets closer to Thanksgiving.
Position the pumpkins and fall decor on your front steps.
 My favorite part of the scrap wood pumpkins is the teeth on the two larger ones. They look like little kids – all toothy and grinny. So much fun!
Have you ever used reclaimed wood in a decor project? Tell us about it in the comments below. I’d love to see your projects.
Pin this scrap wood pumpkin DIY project
Would you like a reminder of this project for making pumpkins from reclaimed wood?? Pin this image to one of your DIY boards on Pinterest so that you can easily find it later.

Admin note: This article for making pumpkins from reclaimed wood first appeared on the blog in October of 2015. This post has been updated with new photos and a slideshow video featuring easy Halloween decor projects.
DIY Reclaimed Wood Pumpkins - Easy Fall Decor Project
These adorable pumpkin decorations are made from reclaimed wood from an old mailbox post.
They are simple to make with just a few basic craft supplies and a bit of time.
Materials
- 3 pieces of 4 x 4-inch reclaimed wood. (4-inch, 6-inch, and 8-inch pieces)
- 3 small garden twigs
- A piece of moss
- Natural raffia
- Acrylic paint
- Brown pipe cleaner
- Small paintbrush
- Black paint pen
- Autumn floral picks
Tools
- Hot glue gun and glue sticks
- Optional: Filler, and sandpaper (If your wood is in bad condition).
Instructions
- Optional: If the wood is in bad condition, fill the cracks and sand with sandpaper until smooth.
- Paint the reclaimed wood with orange paint. Let it dry.
- Use a paint pen to outline the faces on the orange pieces of wood.
- You can do this freehand or with tracing paper and this pattern.
- Paint three pieces of twigs for pumpkin stems.
- Attach them with hot glue to the middle of the top of each orange block.
- Use pieces of the floral picks, some moss, and a brown pipe cleaner to decorate the painted stems.
- Attach these pieces to the three stems with hot glue.
- Add a few pieces of natural raffia to make hair. One block gets a crew cut, the girly girl pumpkin gets long hair, and the funky guy gets a funky haircut!
- Use the black paint pen to outline the designs on the faces and paint them with black, orange, and white colors according the the design in the pattern.
- Display the scrap wood pumpkins on your front steps with pinecones, mini pumpkins, and fall leaves.
Recommended Products
As an Amazon Associate and member of other affiliate programs, I earn from qualifying purchases.


Heather
Monday 19th of October 2015
These are adorable!!
Carol
Monday 19th of October 2015
Thanks Heather. They were so much fun to make.
Evelyne
Saturday 17th of October 2015
I love these! What a nice change
Carol
Saturday 17th of October 2015
Sort of quirky but I love them too!
Renee Fuller
Friday 16th of October 2015
This is a super cute idea for Halloween
Carol
Friday 16th of October 2015
They were a ball to make!