
This Burlap Wine Bottle Bag is an inexpensive way to dress up a bottle of wine for a Christmas gift.
Many of our friends are wine drinkers and I love to purchase one of their favorite wines to give to them for the holidays. Adding this home made bag also adds an extra special touch to the gift.
The Burlap Wine Bottle Bag is easy to make and most of the supplies can be purchased at your local craft store or online. 
Wine is such a popular drink that there are many national days devoted to celebrating the varietals of it. Let’s find out how to make this wine bottle bag for one of your friends.
Making a wine bag
I found some great looking burlap holiday ribbon at my Dollar Store the last time I was on a craft run and it will come in handy to decorate this bag for Christmas.
I find that bottles are one of the hardest items to wrap. I never seem to get both edges of the bottle looking neat.
Having a Burlap Wine Bottle Bag on hand transforms an untidy Christmas gift into something extra special.
Note: The sewing machine and iron used for this project can be dangerous unless used properly and with adequate precautions, including safety protection. If you are a younger person or are inexperienced with electrical tools, ask for help from a parent, teacher or a professional with experience.
It’s time to make the Burlap Wine Bottle Bag.
The bag is very easy to make. You’ll need the following supplies
- Fusible interfacing 16″ x 8 1/2″
- 1 piece of green Burlap fabric, each 16″ x 8 1/2″
- Burlap holiday ribbon 2 1/2″ wide,
- Additional fusible bonding for the ribbon
- Iron
- Sewing machine
- Scissors and thread
- One piece of red and white butcher’s twine approximately 36″ long
- Large embroidery needle
- n a 750 ml size.1 bottle of your favorite wine.

Cut the burlap fabric into two pieces, each 16″ x 8 1/2″. Iron on a piece of fusible interfacing to the back of the front piece of burlap, trimming about 1″ off the top edge, to make it easier to make the final edge when the bag is finished. 
Turn the fused burlap piece to the front side and lay your burlap ribbon over the top of it.
Iron the fusing material on the back of the ribbon. Then remove the fusing backing and iron the burlap ribbon on to the front of one of the pieces.
You’ll attach it just about where the bottle neck will start to get smaller (about 6 1/2″ up from the bottom of the burlap piece.)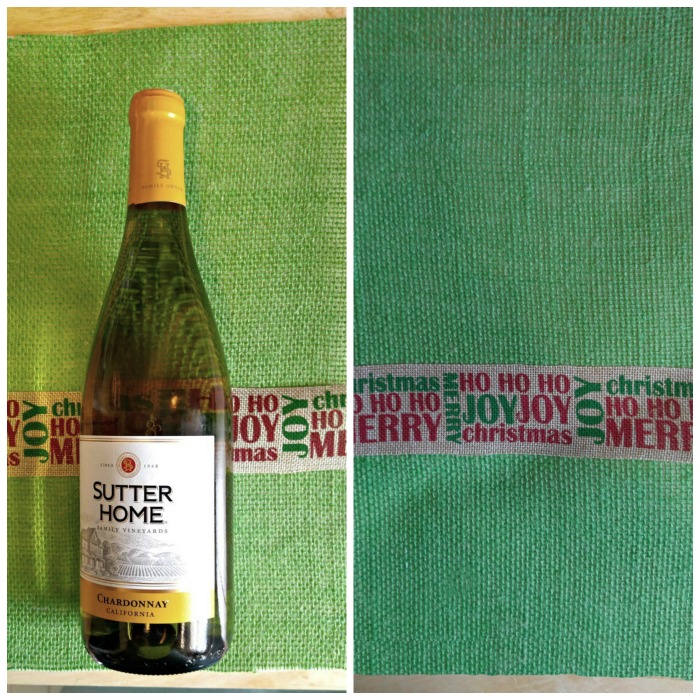
Place the two pieces of burlap together with right sides facing each other. Pin them and then stitch them together with a 1/2″ seam along both sides and the bottom of the bag.
Now it is time to make the bottom of the bag a bit more squared off. Lay your finished tube down with the seam facing you.
Insert your hand into the tube and pull the bottom of the bag in, making two triangle edges. The edges will not be even.
Play with them a bit until you get them so that they match. Measure down 1 1/2″ from the corner on each triangle and make a mark.
Sew across the edges of the triangle and trim the excess fabric. 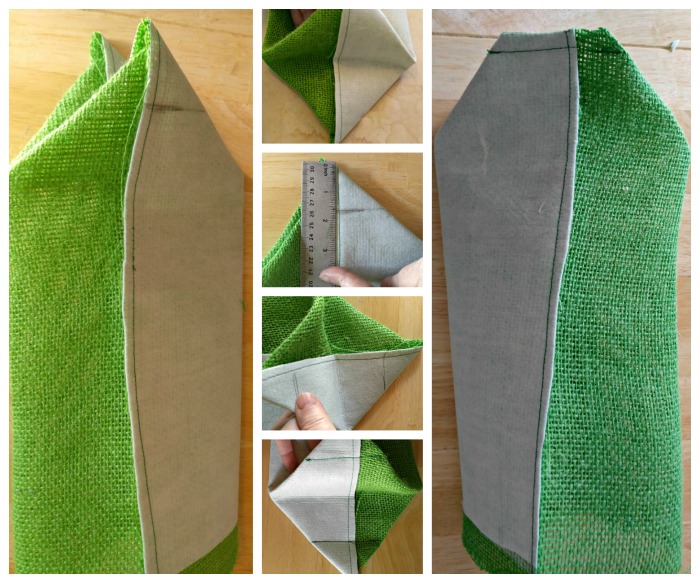
Now you have a nicely shaped box bottom! Turn the bag right side out and look at the cool pleats on the corners of the bag! It’s much better than messy wrapping paper, don’t you think?
With the bag turned right side out, fold under the top opening of the bag twice so that the edge is sealed, and iron in place. Stitch the opening securely.
For the drawstring closing, thread a large embroidery needle with the red and white striped butcher twine. Stitch it in and out around the neck of the bag, about 3″ down from the top opening making 1″ stitches.
Tie a knot in the end of each piece of the twine and pull the thread tight and tie a bow at the top, holding the neck of the bottle in place.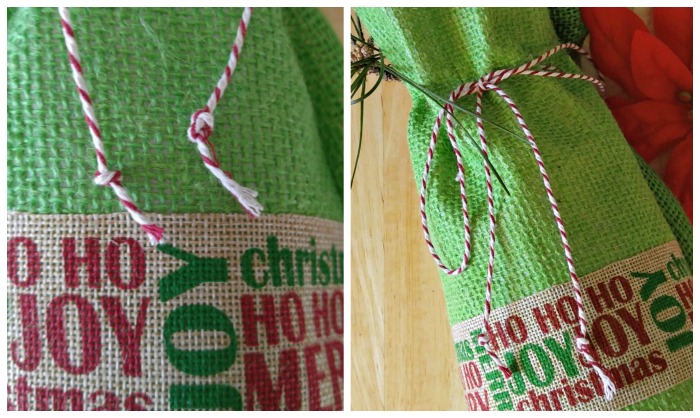
If you would like you can add your favorite Christmas tag or print one of these labels from my holiday blog here.
TaDa! That is all there is to it. 
This great looking Burlap Wine Bottle Bag is the perfect way to wrap and give a bottle of wine to a friend or family member.
It is decorative and full of the holiday cheer. I made mine in about an hour and the cost was very little. 
Jesenia
Thursday 1st of December 2016
This is a wonderful idea! I'm not very crafty, but you made it very easy to follow. Just in time for the holiday season! Thanks for sharing!
Carol
Thursday 1st of December 2016
Hi Jesenia. Normally I do a different type of craft but decided to get out my sewing machine for this one. It was really very easy to do. I love that the recipient can reuse it later! Carol