
This pantry closet makeover tutorial will show you how to make a tiny kitchen closet into a mini walk in pantry.
My kitchen is small. It’s a gallery kitchen with very little counter space, so I am always optimizing it for extra storage. The pantry is the size of a small closet and every single thing in it plays hide and go seek with me when I try to cook.
I have had enough of this baloney and decided that it was time for a pantry makeover!
The pantry had some shelving in it. The problem has always been that the shelves come right to the door of the closet.
That means that even though I have some organizational plan in there, there are always things that just get shoved to the back. When I am making recipes, I look for them, can’t find them and add them to my shopping list.
And it goes on and on. Can you imaging trying to find anything in here?
Fortunately we have a huge dining room table, which gave me a place to store everything while we were working on the pantry closet makeover.
Now bear in mind that this dining room table has enough room around it for 10 full sized dining room chairs.
If I were a betting woman, I would never have wagered that ALL OF THIS STUFF was sitting in my small pantry. I’m still stunned about it weeks into the makeover.
Not only that, but there was also stuff on the floor as well! My mind can simply not comprehend how one tiny pantry can hold all this STUFF.
Oh…and while we are at it…what on earth does one woman need with 6 (count ’em) bags of self raising flour???? There were also two bags of whole wheat pastry flour, a bag of almond flour, some cake flour and more.
And don’t even let me get started on the excess sugar supply. I swear, I won’t have to buy baking supplies for 10 years!~ 😉
Note: Power tools, electricity, and other items used for this project can be dangerous unless used properly and with adequate precautions, including safety protection.
Please use extreme caution when using power tools and electricity. Always wear protective equipment, and learn to use your tools before you start any project.
Pantry Closet Makeover
Whoops…got side tracked there for a minute. Back to my plan for my pantry closet makeover.
In spite of the small doorway opening, (23 inches wide at the doorway and about 30 inches on the interior wall spacing) I knew that I wanted the pantry to be a “walk in.”
My sweet husband measured the opening after we decided what size to make the shelves. I said “See, I’ll fit!!”
He said “yes, there you will” (looking at my shoulders), and then looked at my hips and grinned.
Good thing he is a handyman, and will be doing most of the work on this little project or he would not be getting any baked goods for a while!! The first step for my pantry closet makeover was to remove half of the shelving on the existing shelf set up.
Each shelf was made of two pieces, so we had enough wood for the whole back wall, even with extra shelves.
We decided that we would keep that placement (23 inches apart) and then add more shelf braces between the existing shelves to give me room for the cut out area where I am determined my hips WILL fit.
We had to do the back shelves first, since we were using side braces to hold the back shelves and there is no way to get them in once those extra side braces were attached to the pantry wall.
Some of the back shelves will stay spaced widely as they were before and others have extra shelves between them.
I wanted to absolutely maximize the inner space, since I knew that ALL THAT STUFF had to find a way to fit back in there, along with my ample hips.
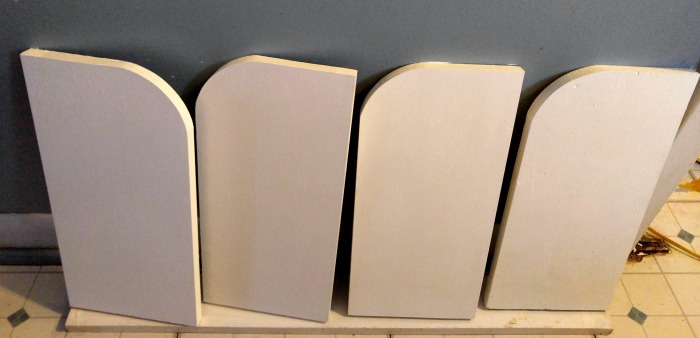
To round the corners of the entry shelves, Richard used a metal mixing bowl with the right curve on it and cut the corner off with a Skilsaw, and then sanded it with sandpaper.
A fresh coat of white paint got added to all the shelves and we were ready to get started on the pantry closet makeover.
Since I had a combination of normal canned good sized items and taller bottles and oils, I decided to have one whole side have and extra shelf to hold the smaller sized cans.
Those shelves go all the way up the right side of the pantry and are spaced evenly between the existing shelves.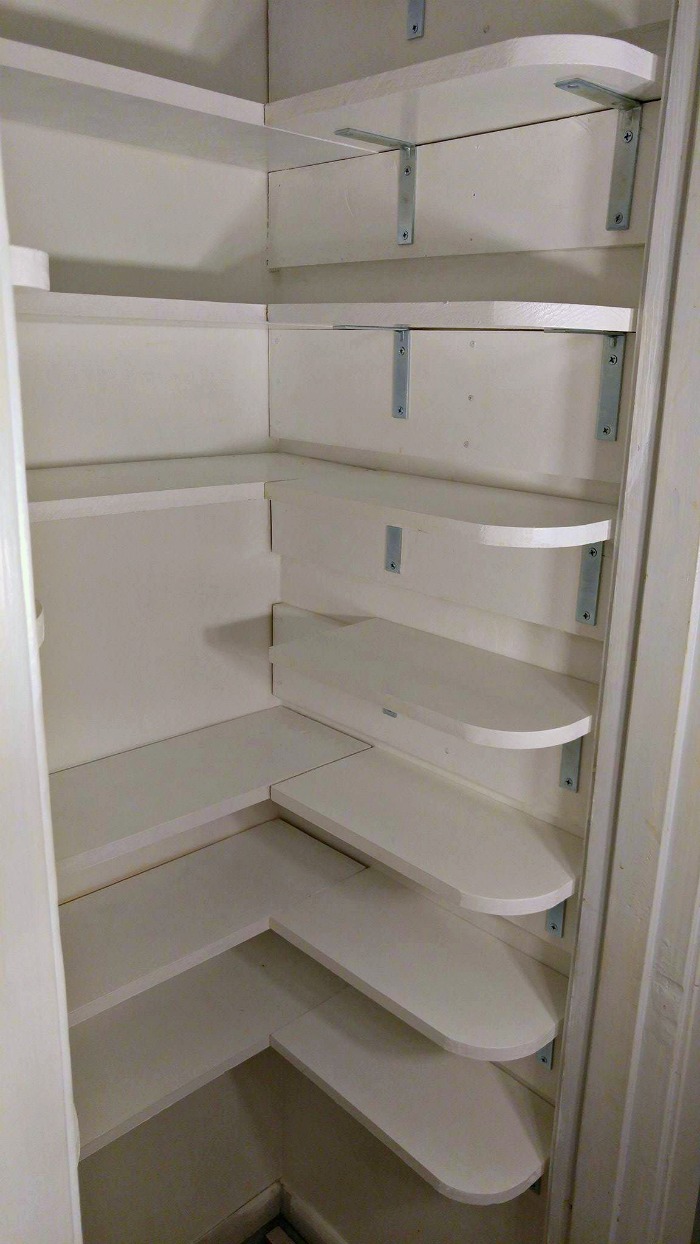
All of the side shelves are held in place with L shaped brackets which are screwed into the side braces.
The left side of the pantry would be a combination of existing spacing as well as some with the extra shelf. We also went higher in the closet and lower than it is now.
The last part of the pantry closet makeover was that we would remove a concertina style door that opened into the kitchen and replace it with a sliding bar door style.
At this point I was getting excited and saw my whole kitchen getting a redo and started stripping wallpaper off the walls to “help out.”
My husband was not a happy camper when he came home and saw this but that’s what he gets for his hip grinning moment.
A quick paint of the skirting board, and removal of the old trim, and the finished interior is completed!

Time to see of all of my supplies will fit back into the finished pantry. I have been cooking up a storm this week, trying to use up some of the excess supplies.
After all, who really needs 7 boxes of penne pasta, I ask you? We haven’t bought groceries in two weeks while this has been going on! I already knew that I was only going to put back in what I want to have in there.
I had some 20 year old dried beans that ended up in the trash and some of the overkill on excess went into packing boxes for a while, but, even still, most of it fit back in.
the photo below shows the entire pantry in the middle and closeups of the two side walls. I am delighted with the way it came out! 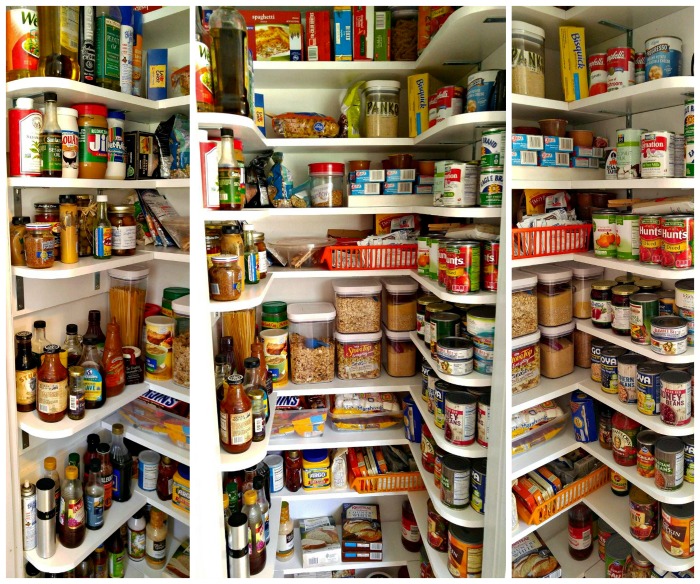
And even though there is not QUITE as much space, I CAN SEE IT ALL NOW!!! I’ll gladly give up a bit of space to be able to see what I have on hand.
I just love the way things are spaced out. The shelves are the perfect height for my different Oxo Pop containers and I am a happy camper.
OH…and by the way…MY HIPS FIT PERFECTLY, thank you very much!

Supply List:
These were the supplies that we needed to complete the project. The barn door will come together later so we didn’t buy those supplies yet.
- Primed white trim board in a 7 1/4 inch width was inexpensive and the perfect size for the side shelves.
- The existing selves were removed and trimmed with a circular saw to a width of 8 inches. These will go on the back wall of the pantry.
- L shaped metal brackets
- Screws
- White paintA blade for a Skilsaw to round the corners of the edges near the opening so I don’t hurt myself when I enter the pantry.
The next step is to do the barn board sliding door to replace this concertina door. Stay tuned for this project! What kind of set up do you have in a small kitchen to hold all your supplies? I’d love to hear about it in the comments below!

Once we got the pantry finished, it needed a new door. See my project for a shiplap barn door here. 
debbie-dabble
Saturday 12th of August 2023
Carol, What a great idea!! I have a small pantry closet that my husband maintains and he is OCD about it...Unfortunately, it is too small for shelves on the sides but this idea could be used in other areas so thank you for sharing!!! Hugs, Deb
Joi
Saturday 14th of January 2023
I love this! My pantry is exactly like yours! I told hubby what I wanted to do years ago, and couldn’t find it on here. Now, in 2023 I’ve found it! Yaaay!! *\0/* I will be sharing your pictures with him and hope he will convert ours.
Thank you so much!
Carol Speake
Tuesday 17th of January 2023
I'm glad you found the tutorial useful. Best of luck on your transformation!
Pam O.
Saturday 12th of February 2022
Carol thank you so much for this inspiration! When we moved and remodeled the kitchen earlier this year my hubby asked if the pantry was okay. With a quick look-see I said yes. Boy was that a mistake. My 25x25 pantry is a nightmare. With such deep shelves it is next to impossible to keep it organized. After searching high and low on Pinterest I found your post. This is a perfect solute to my big problem. Believe me when I say this WILL happen in my pantry very soon. Thank you again! Can’t wAit for the redo.
Carol Speake
Monday 14th of February 2022
Hope you love it as much as I do mine!
Jessica
Saturday 17th of July 2021
I have the same problem in my pantry. I can never find anything or it gets pushed to the back. I’ve been searching for someone to have my vision and voila! I found your post. Thank you for the inspiration!!!
Bronwyn Robertson
Thursday 24th of September 2020
Thank you Carol, we had an old boiler removed just before COVID lockdown which liberated a space a few inches larger than your pantry. I spent ages on Pinterest looking for inspiration and couldn't find any comparable space until I came across yours! I've now measured, designed, and found a carpenter and the work will be done in the next week or so. I'm so excited, and thanks to you for the inspiration! Stay safe, Bronwyn
Carol Speake
Thursday 24th of September 2020
Hi Bronwyn. I hope you enjoy yours as much as I have mine. It's a pleasure to open that door now!